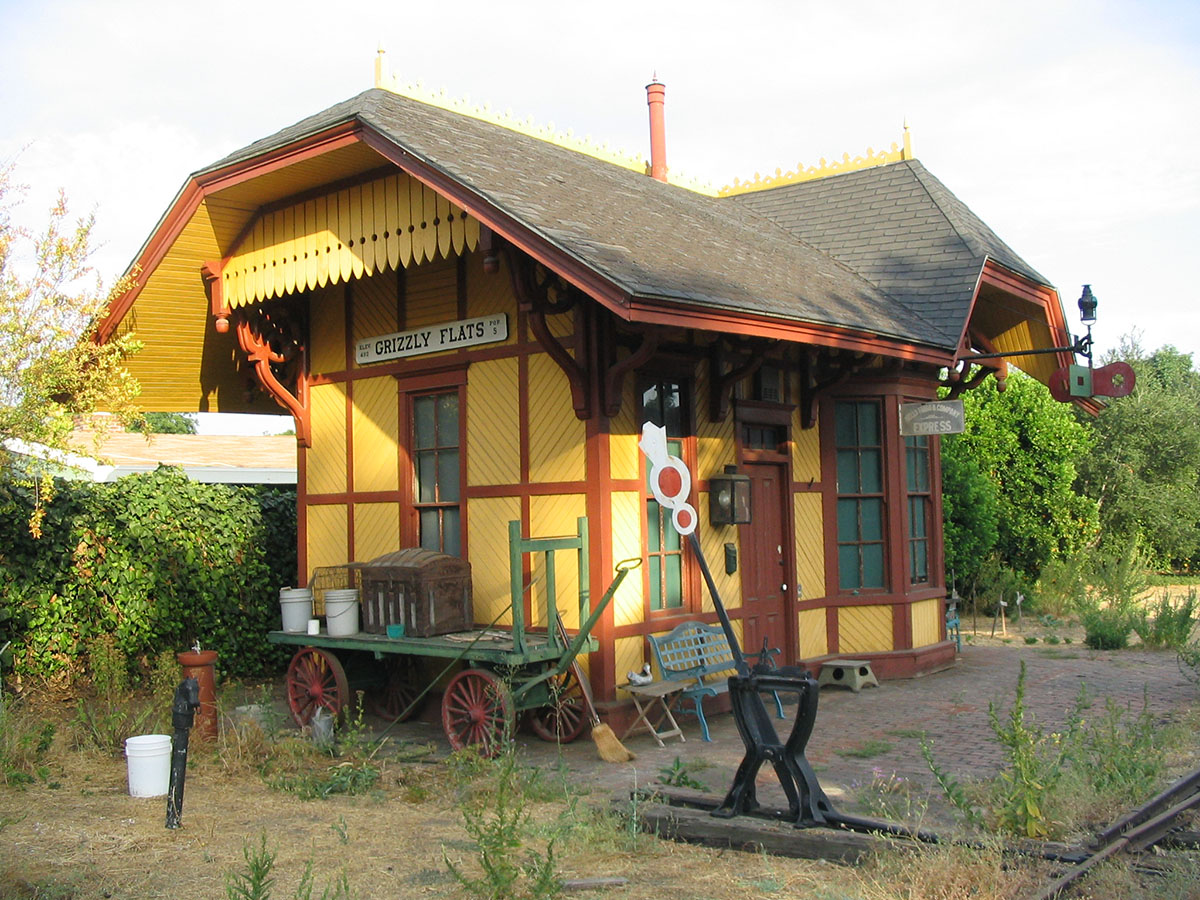
It all started with a kind gift from my friend Robert Kurner. You may remember Robert as the delightfully creative fellow behind the tiki/jungle cruise/typhoon lagoon themed Jungle Navigation Company Railroad. Anyway, Robert gave me one of the old Scale Structures LTD Grizzly Flats Depot kits in O scale. The kit was based on the depot for Ward Kimball's 3' gauge Grizzly Flats backyard railroad, but its history goes farther back than that. Ward had found drawings of an old Lehigh Valley Railroad flag depot while doing research for the Disney film, So Dear to My Heart. Walt liked the design and so a set was built for the film based upon those drawings (fun trivia fact: a facsimile of Walt's Carolwood Barn also appears as a set in the film). When filming was completed in 1949, Ward asked Walt if he could have the structure for his backyard railroad in San Gabriel, CA. Walt said, sure, if you cam get it out of here, and Ward trucked the set piece home. Then, he and his wife Betty spent the next several years converting the flimsy, unfinished movie set into an actual usable structure with four solid walls and a finished interior. A few years later when Walt was building Disneyland, he saw that nice looking depot on Ward's property and asked if he might have it back for his new park. Ward called him an "Indian giver" and a few other choice names and flatly refused his boss' request. That left Walt with no choice but to dig out those old Lehigh Valley flag stop plans again and have the studio carpenters build a new version for Frontierland at Disneyland. The Disneyland version differs in a few details from Ward's depot, but the overall Victorian gingerbread flavor is the same.


Being well versed in the history, I've aways had a great fondness for this structure and decided right away that I needed to build a version for my Thunder Mesa layout. The only problem was where to put it.
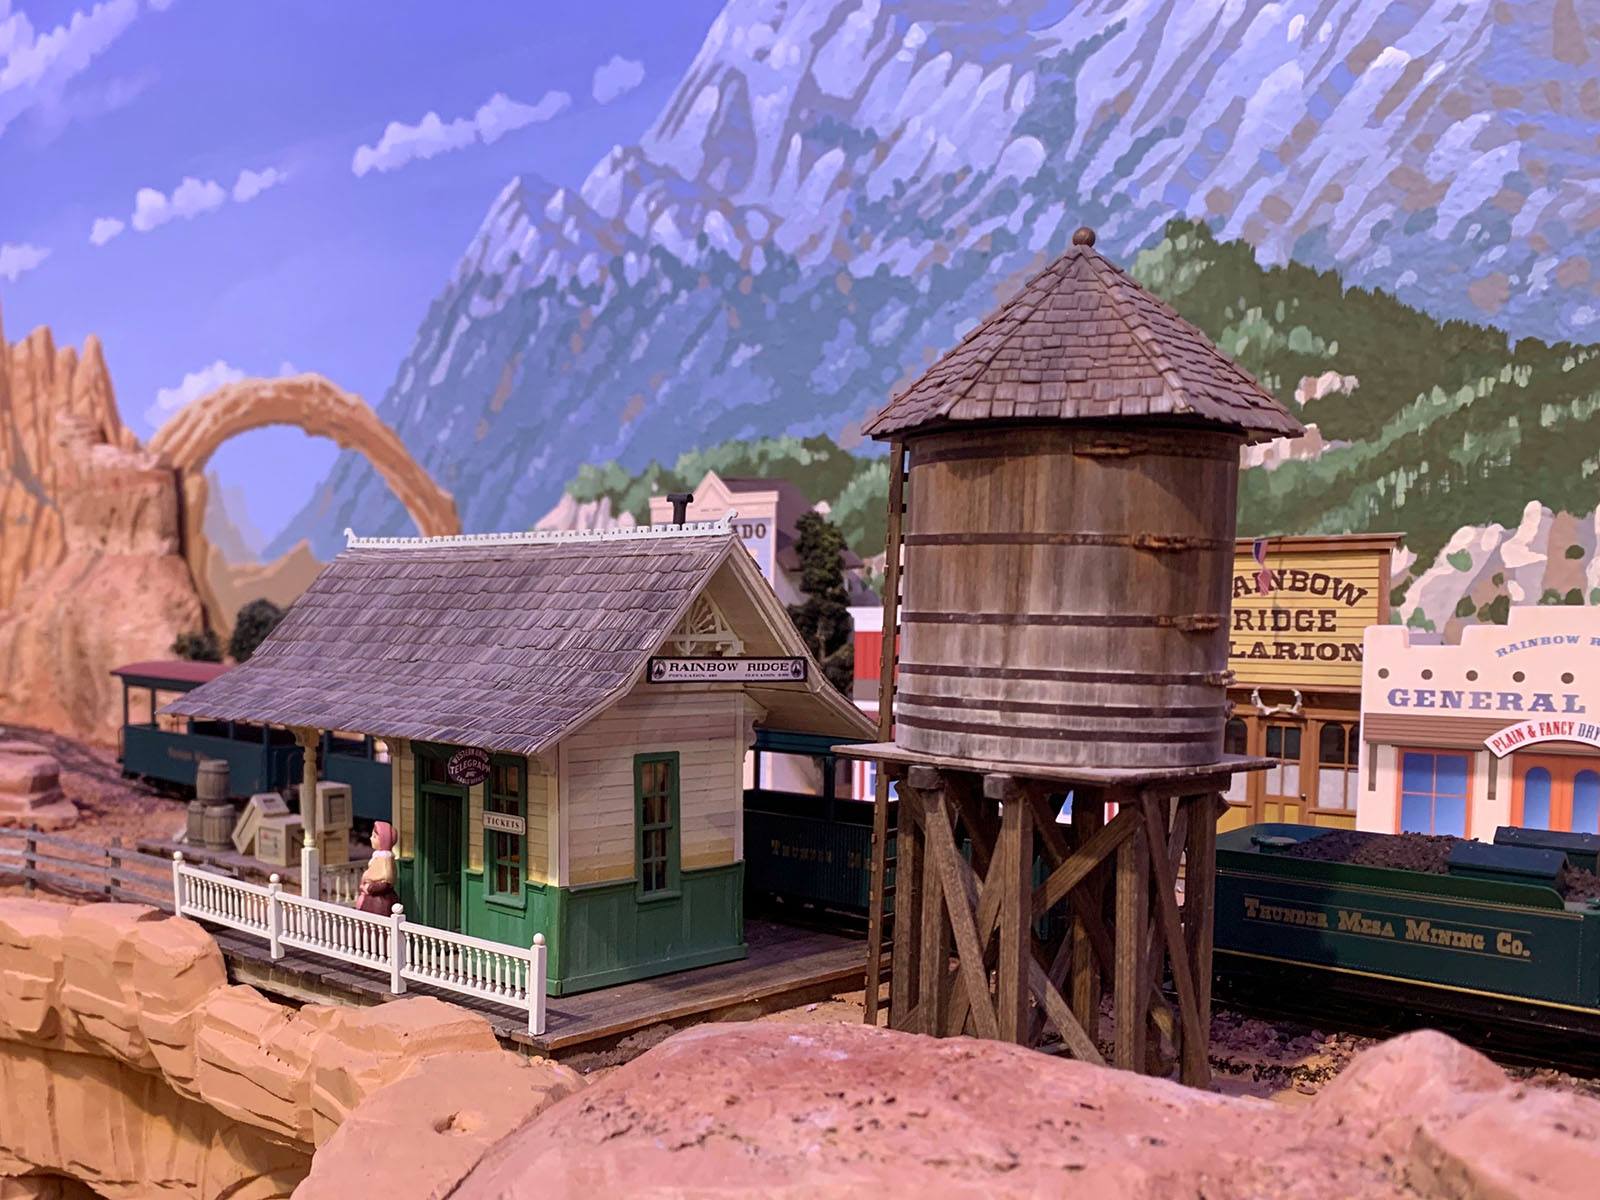
Years ago, I had already scracthbuilt a small depot for my Thunder Mesa town and was quite fond of its looks and proportions. My solution was to move the old depot to the little mining town of Rainbow Ridge where I knew it would fit in perfectly with the small, charming structures there. This freed up the necessary real estate for a new depot at Thunder Mesa.

I began planning for the new depot in January of 2019, but didn't finish the project until March 2020. It didn't need to take that long, but one thing leads to another and I got involved with several other projects along the way. This often happens and I know it can be frustrating for those trying to follow along. I've condensed the entire build here from start to finish as a record and guide for anyone interested.
Like most of my builds, it all started with a paper mock-up...

With the old depot relocated to Rainbow Ridge, I built a paper model mock-up of the Grizzly Flats depot to make sure everything would fit. It did - just barely! This mock-up was made from the Frontierland Station plans you can download free on this website.
The overall footprint is just a little larger than the old depot but the clearances were just fine.
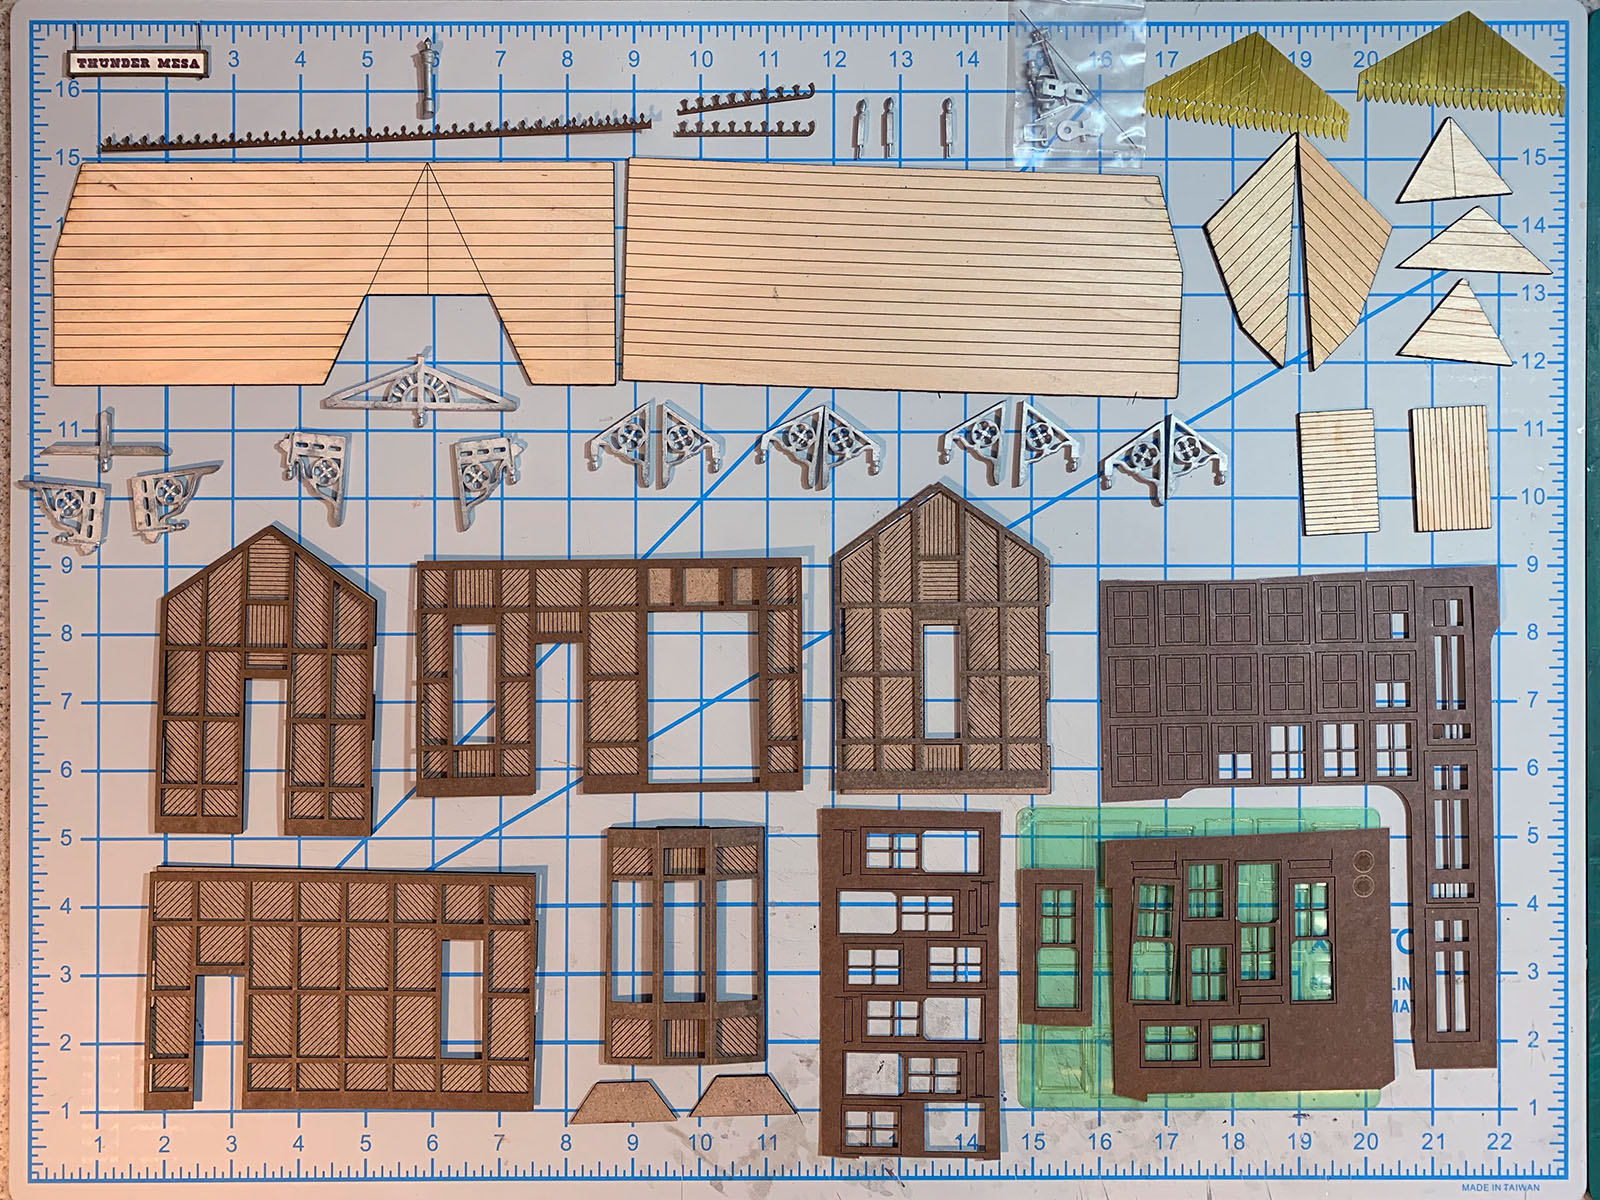
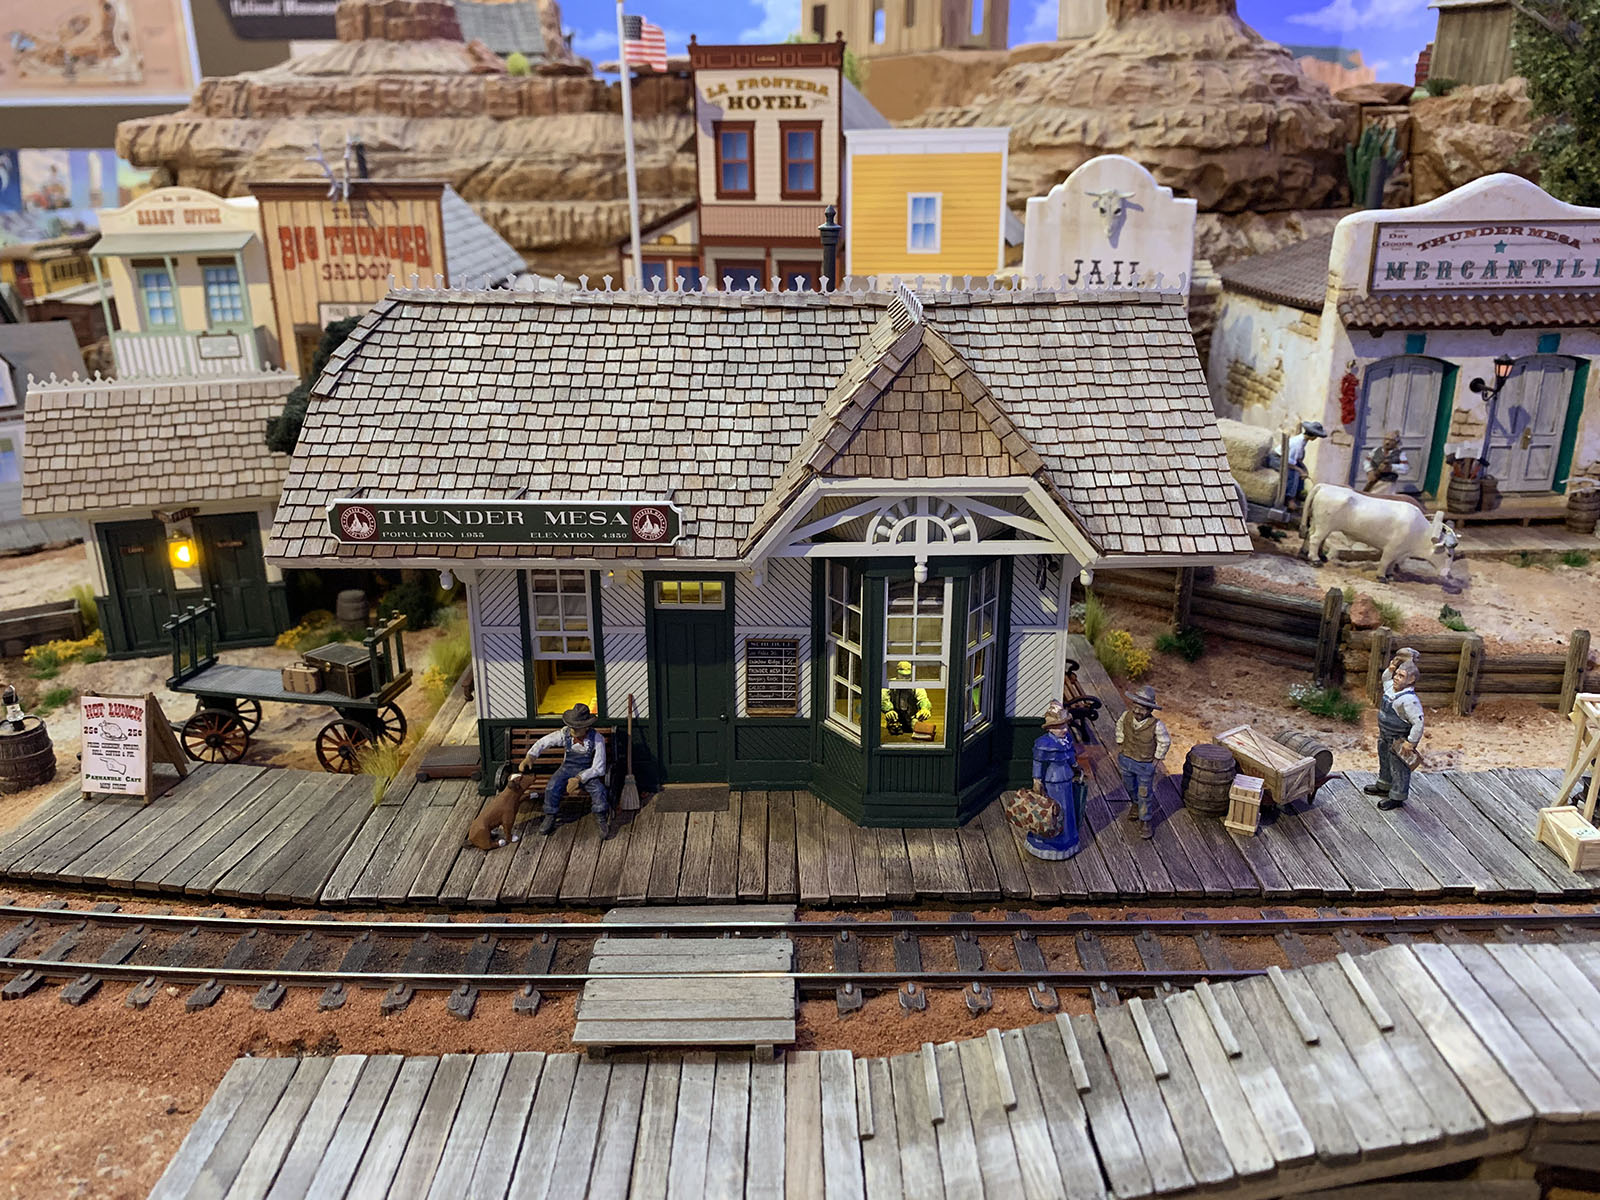
Here are all of the parts laid out prior to painting and assembly. Only the fancy roof brackets and trim are from the original kit. My friend and business partner Jake Johnson had been working on a set of laser cut replacement parts for this kit and I had him cut a set for me. I wanted a depot that was a hybrid between the Grizzly Flats and Frontierland depots, so these parts allow for a door on one end and a window on the other. Disneyland's depot also has double doors and a bay window on both sides. On my version, there is a single door and one bay window on the track facing side like Grizzly Flats.
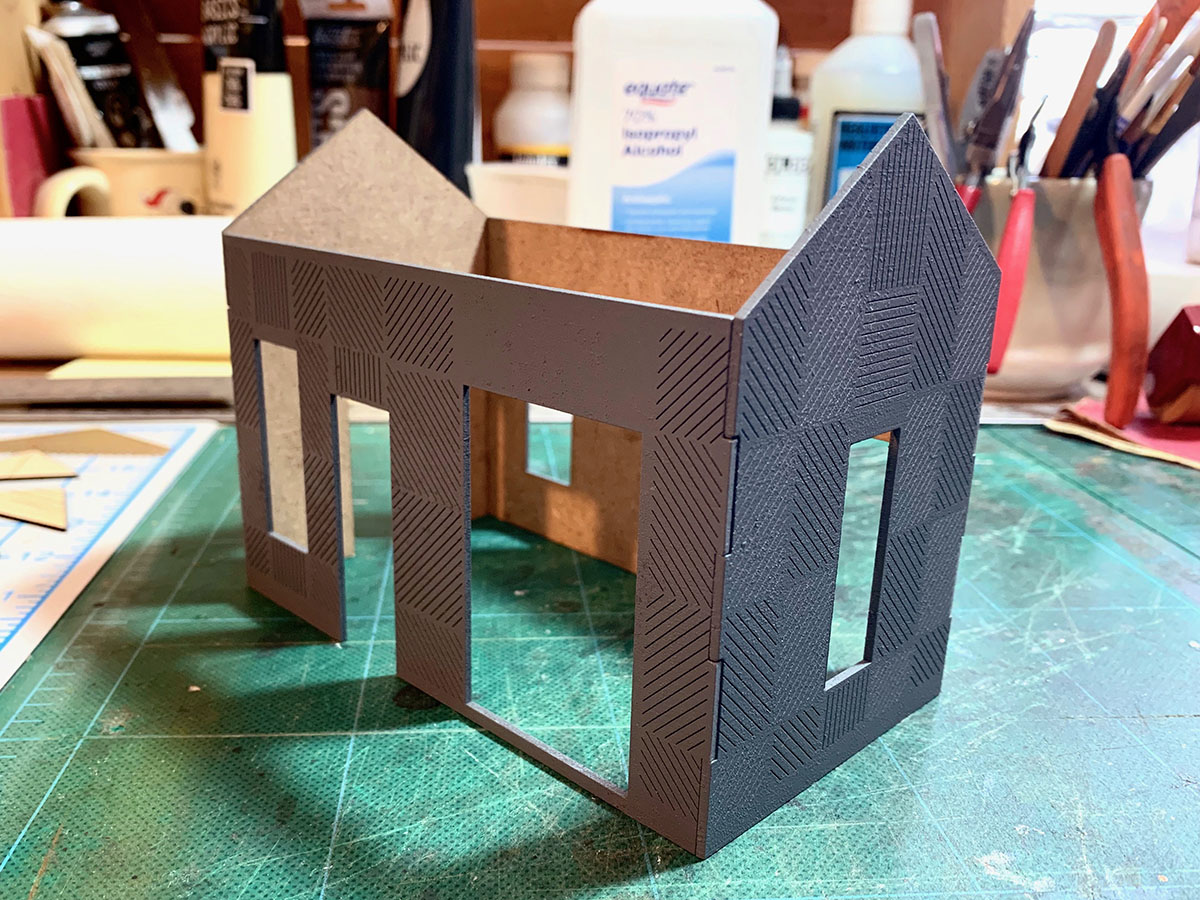
A coat of primer on the exterior walls for the new depot. Gotta love the fit on those laser cut pieces! The walls pieces are 1/16" MDF with tabbed joinery at the corners. This is a dry fit with no glue yet.
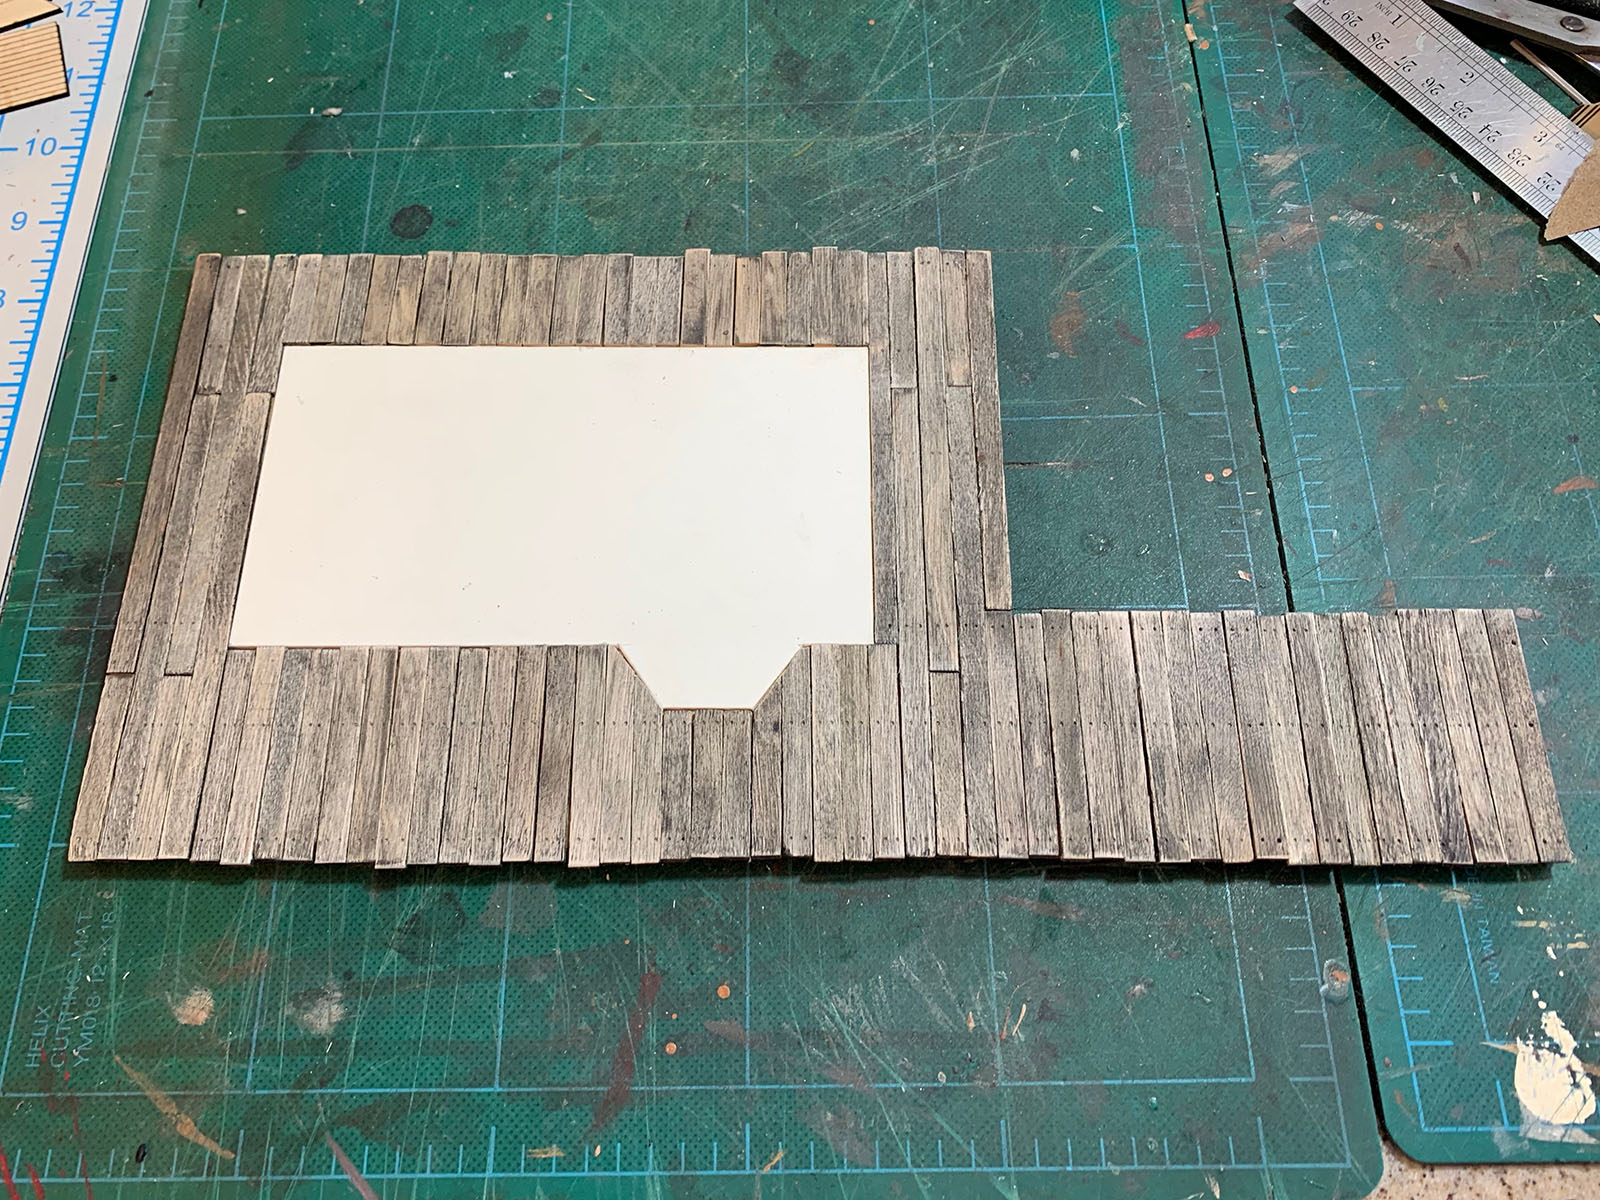
The platform base is a solid piece of 1/4" thick MDF, cut to shape, and the planking is coffee stir sticks that have been distressed with a razor saw and stained with my favorite alcohol and shoe dye mixture. The depot footprint was cut from illustration board and cemented in place as a guide for the planking. Nail holes were added with a hard HB pencil.
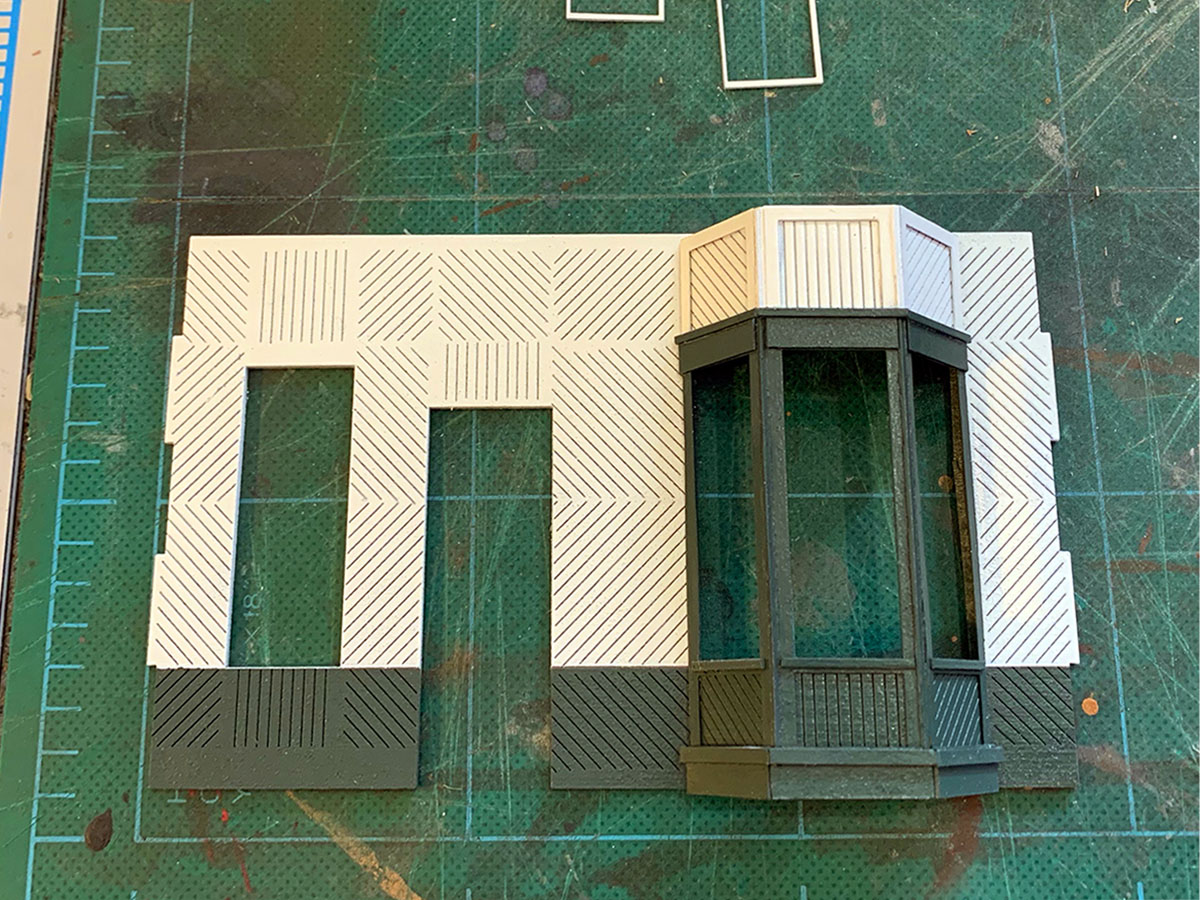
Usually the hardest part of any Grizzly Flats type depot kit is building the intricate bay window. Even with laser cut pieces, this was a challenge, but I wanted to get it done right first before moving on to the rest of the structure. As per my usual practice, all parts were painted before assembly. I decided to stick with the Frontierland/ NOS color scheme of Ivory and Hunter Green and the paints used were inexpensive spray enamels with a satin finish.
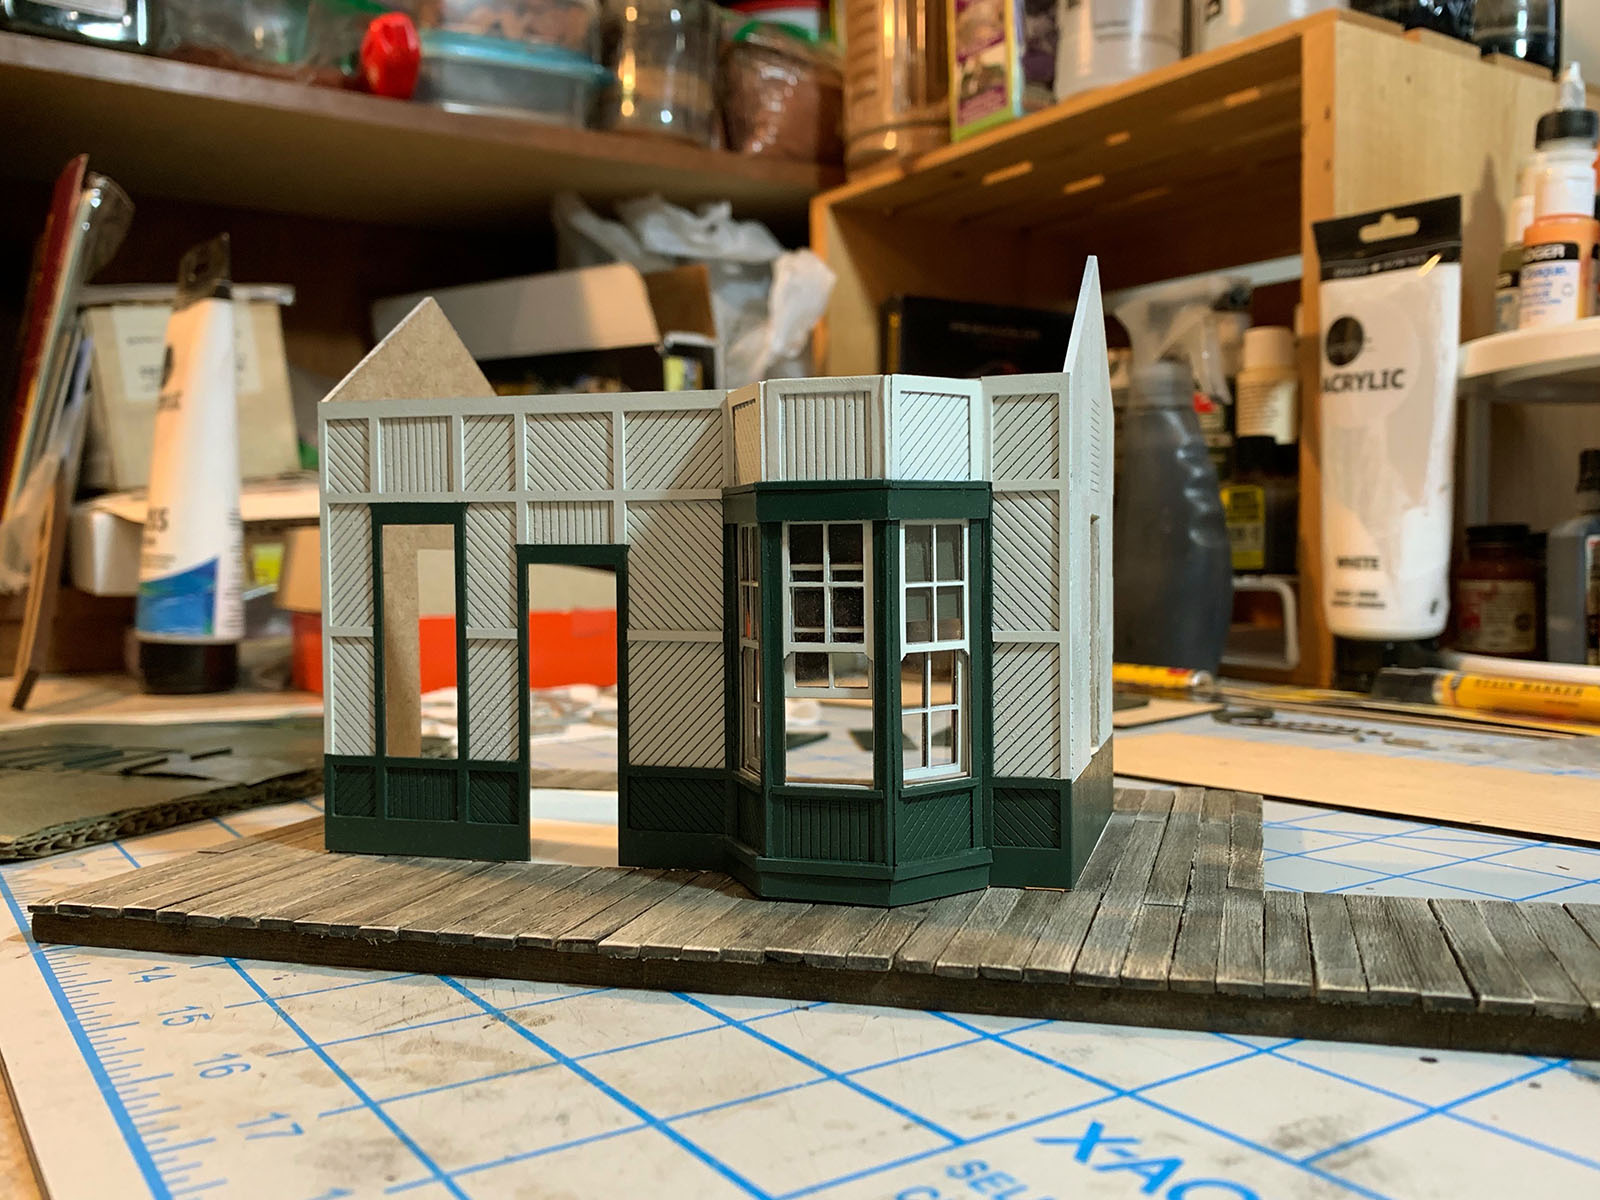
With the bay window sub-assembly complete, I took the time to create two-sided, double hung windows from the laser cut parts since the structure is going to have a detailed interior. I added some blinds to the bay window, then made a start on all that fancy trim.

At the same time that I was working on the exterior walls, doors and windows, I also made a start on the depot interior. The interior walls are 1/16" thick Crescent illustration board left in its natural color, and the wainscoting and trim are dark walnut stained basswood. The roll-up blinds are painted masking tape, doubled and wrapped around toothpicks.

Here is the nearly completed interior opened up like a doll's house. I wanted the interior to look cluttered and busy, walls lined with memorabilia - just like Ward's GF depot. There are a ton of Grizzly Flats and Disney references here if you look closely. The closet like nook in the corner will hide electrical wiring for the lights.
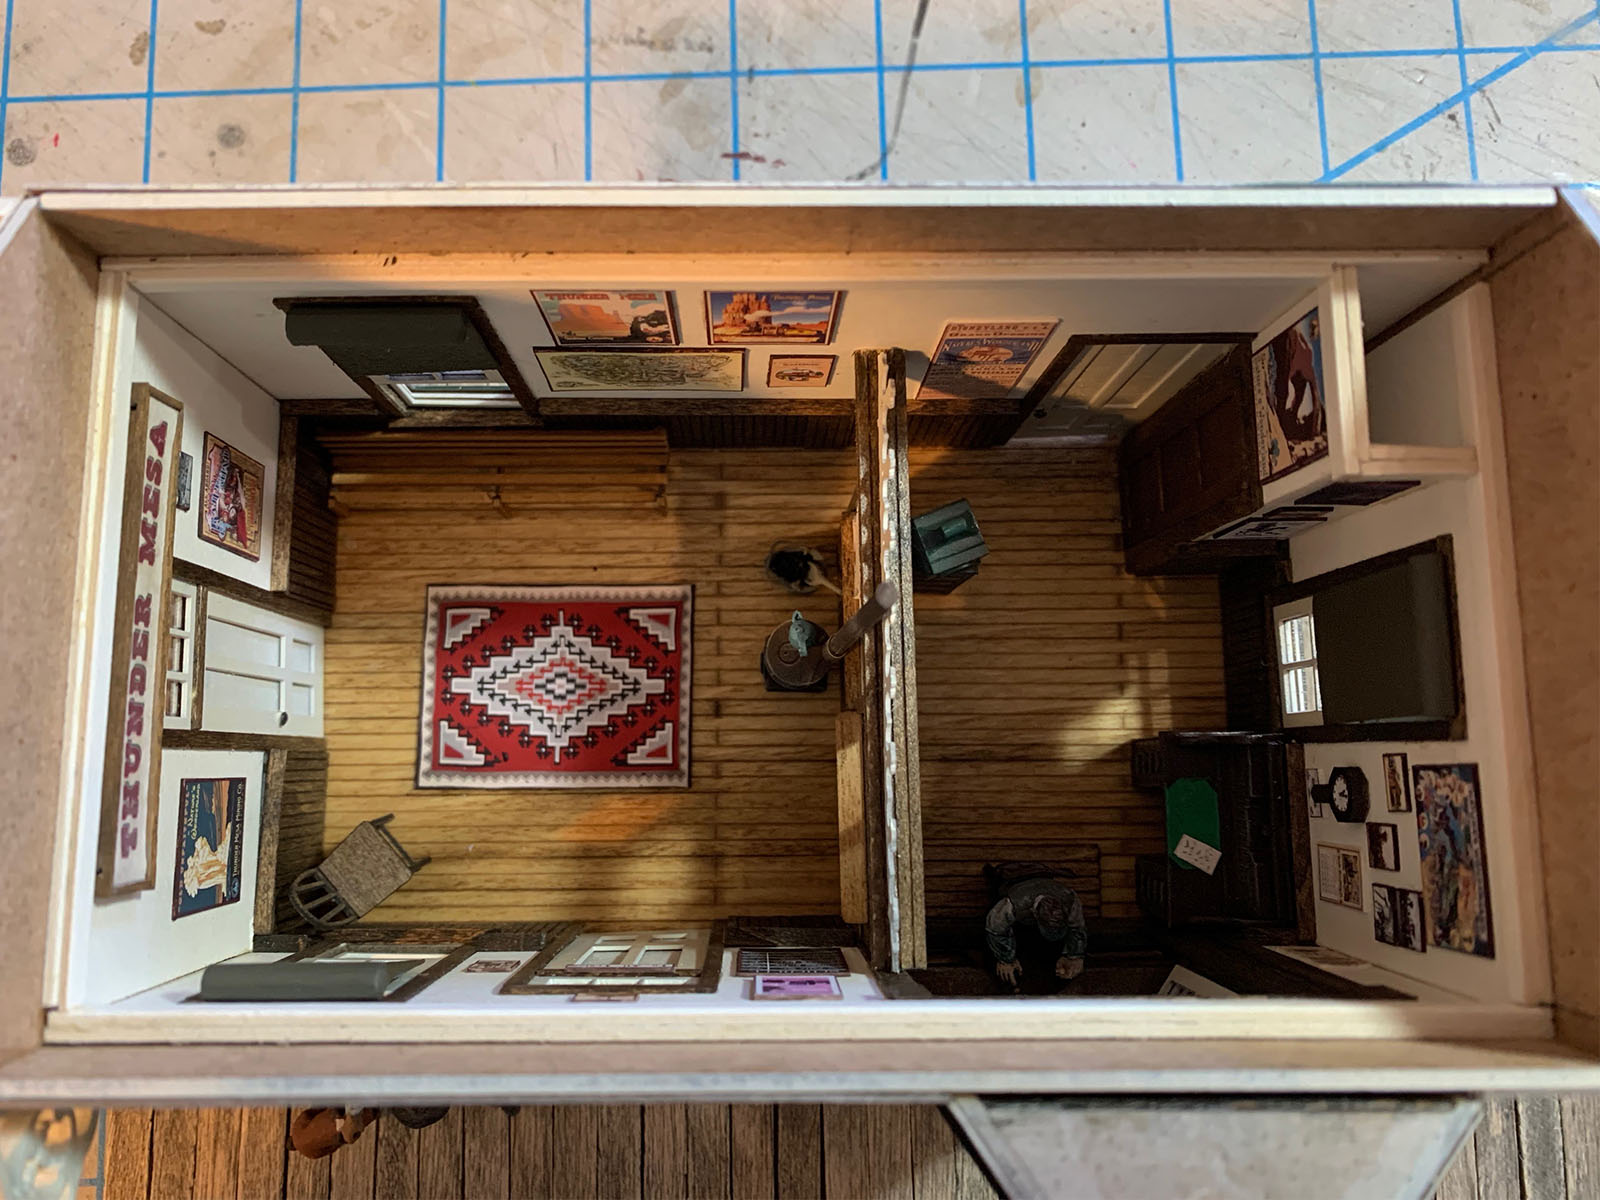
An overhead view of the completed interior. The floor is scribed basswood, stained to a golden oak color. Details are from Berkshire Valley, Wiseman Model Service, Banta, and my scrap box. The Navajo rug was printed from an image I found online and the Thunder Mesa sign is a remnant from the original scratchbuilt depot.

Here, work has begun on the exterior details. The fancy roof corbels are white metal castings from the Scale Structures LTD Grizzly Flats kit. Seen thru the bay window, the telegraph operator is an Aspen Modeling Co. figure. The fella with the dog is none other than Chuckawalla Slim from Verne Niner's Estrella & Sonora Grande. The train order board was created in Photoshop, and the doormats are 300 grit sandpaper painted dark gray.

The roof was built as a separate assembly and designed to be removable as shown in the video. This allows for continued access to the interior details and lighting if required.
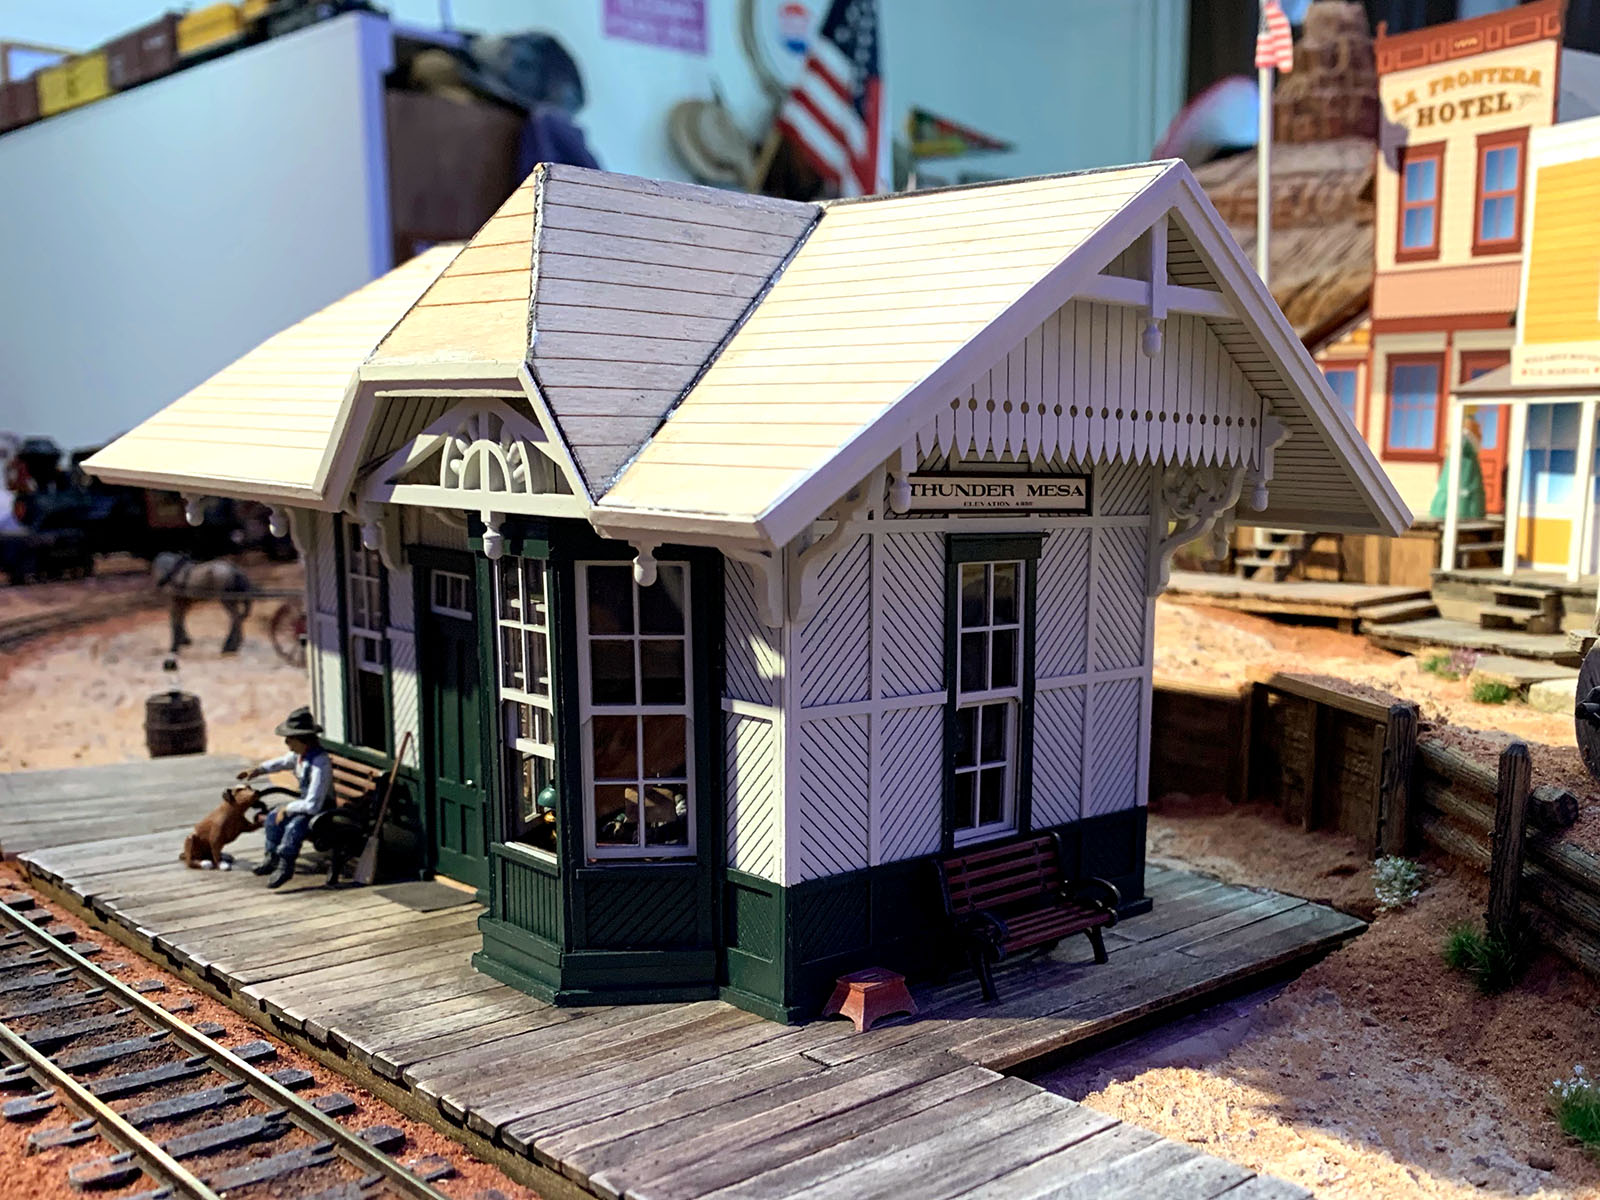
The roof is in place and nearly all of the fancy trim has been added. I lost track of all the compound angles I cut for that roof trim. Note the new "Thunder Mesa" sign below the eaves. This placement is consistent with the Grizzly Flats depot.
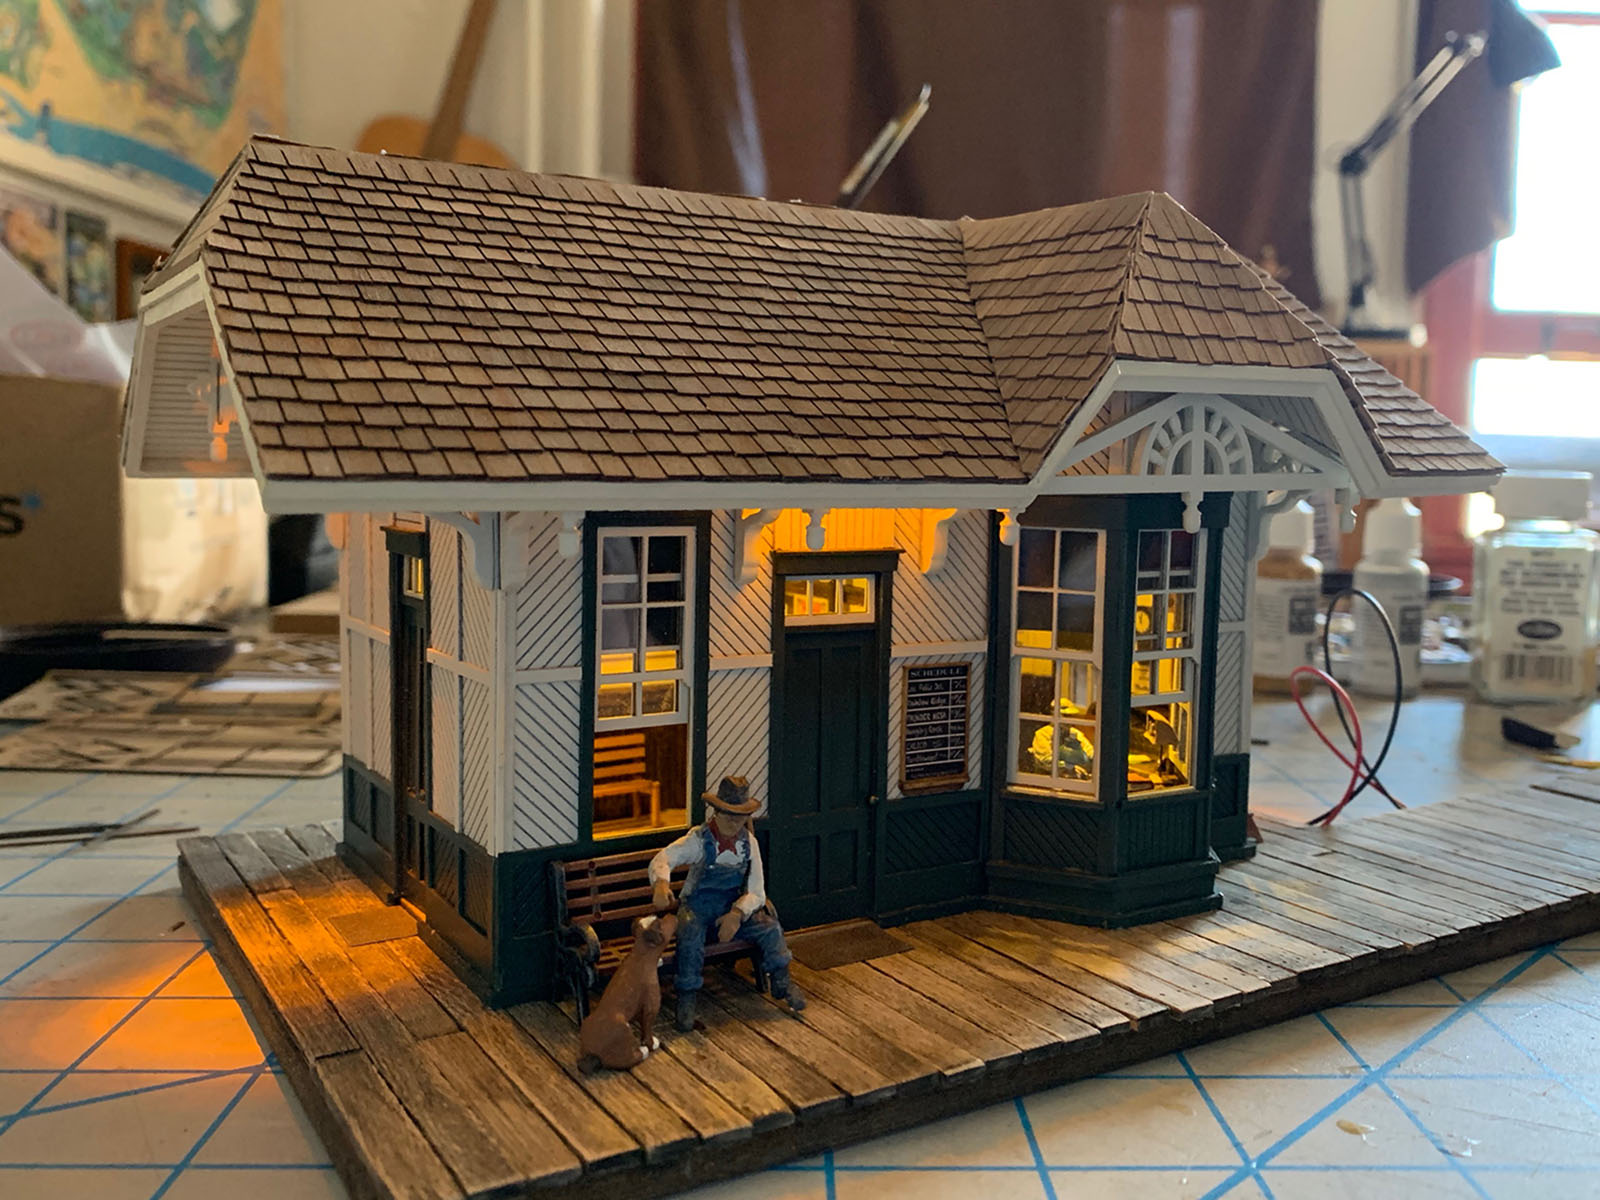
Shingling the roof and getting the lights working. The depot has five 3mm LEDs, 2 warm white to light the interior, and 3 exterior yellow lights to simulate lanterns. The one over the front door flickers. The shingles are real cedar from Crescent Creek Models.
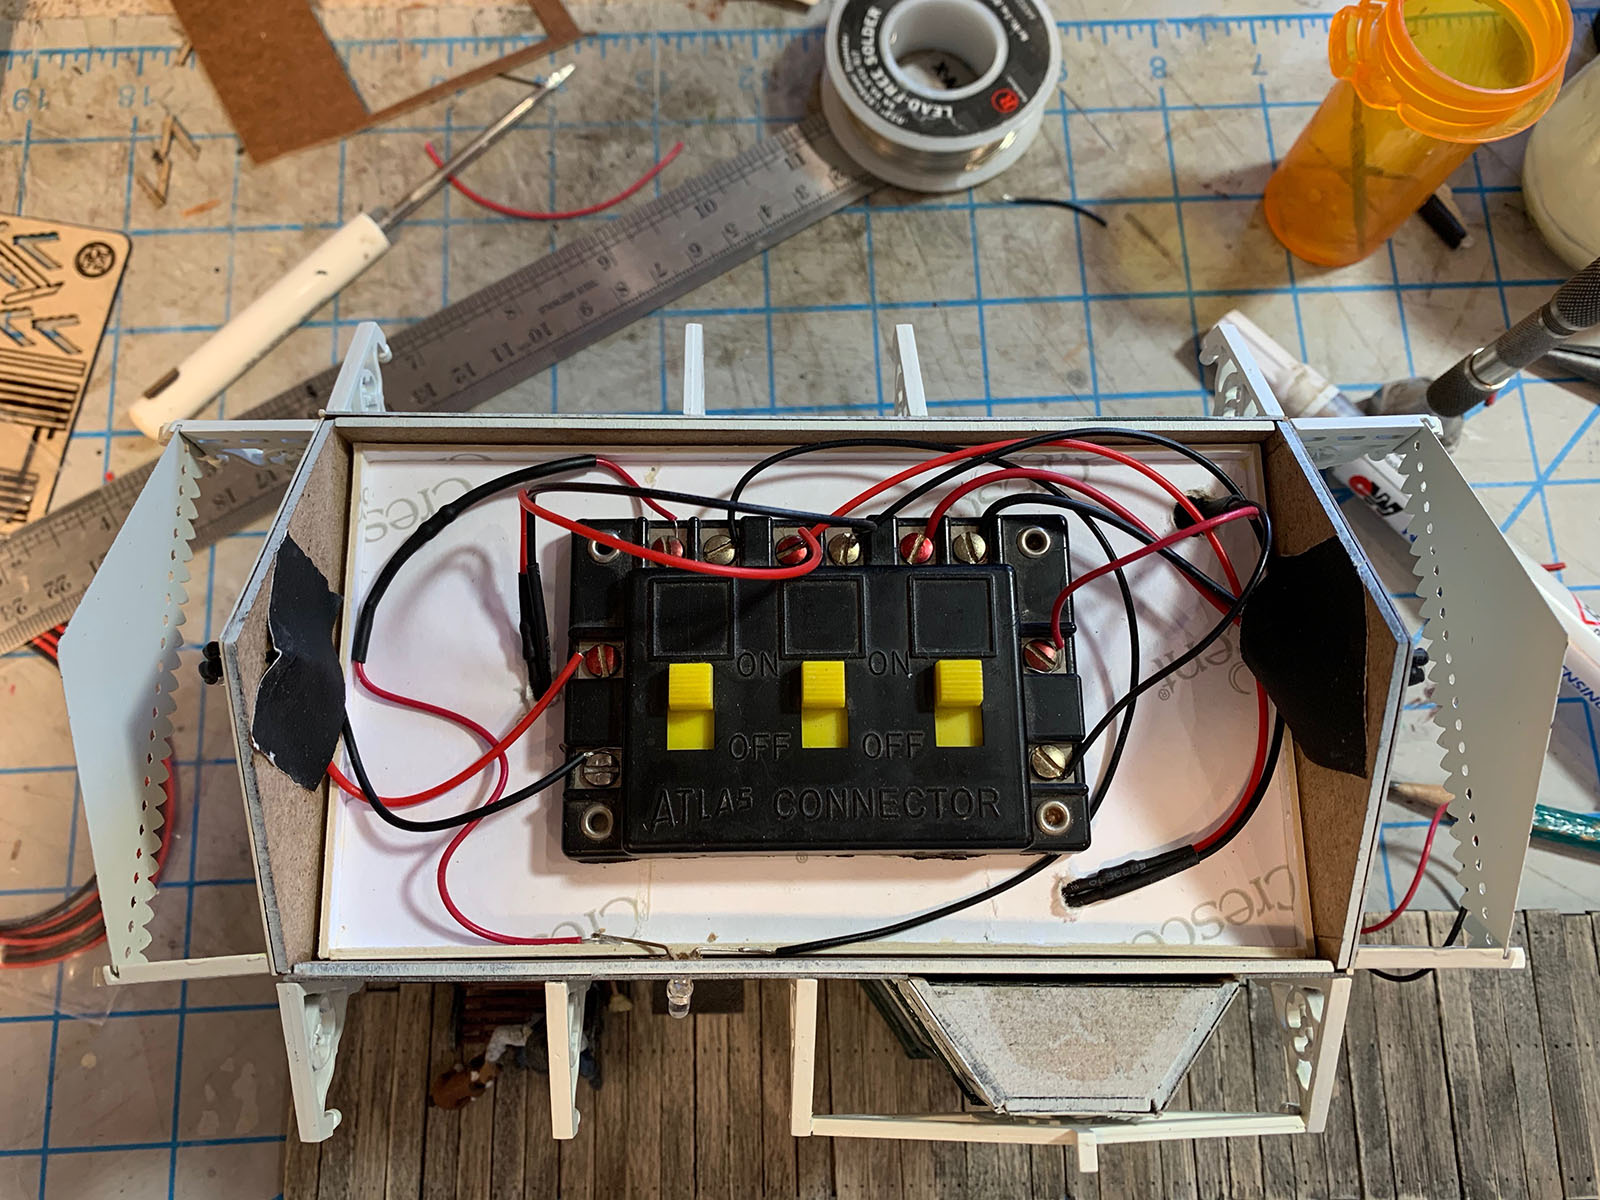
Proof that I never throw anything away and that it eventually finds its way onto the layout. Here's a look at the wiring inside the depot's attic. Yes, that's an old Atlas Connector pulling duty as a power strip. I wanted some sort of terminal strip in case I ever have to change the bulbs (unlikely with LEDs, but still) and this old piece of junk fit the bill just fine. As a bonus, I can even slide the switches and turn some of the lights on or off if I want to. Note that it is cemented to a removable ceiling that prevents light leaks around the roof.
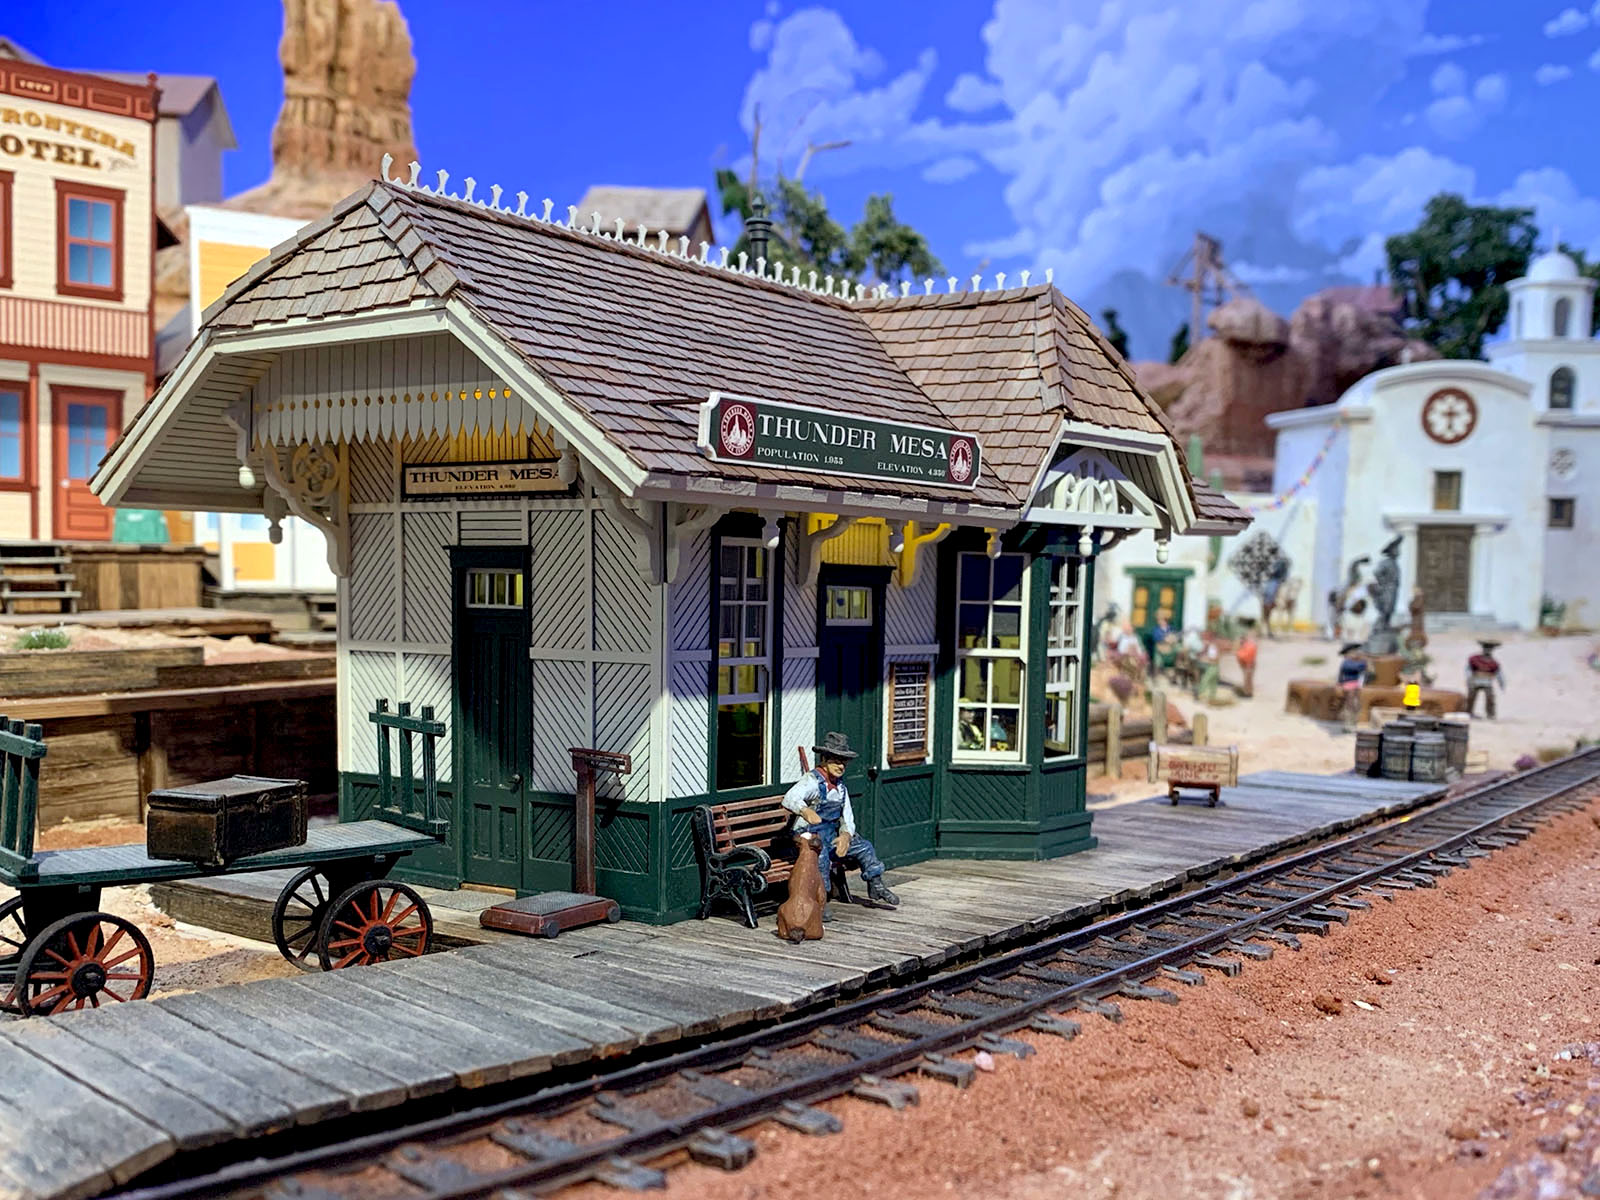
Almost finished! The roof has been completed by adding cap shingles, gingerbread trim, and the main Thunder Mesa sign (which is a callback to the original Frontierland station sign at Disneyland). All that's really left to do now is add a few more details to the platform.

Testing the lights in this nighttime view of the depot scene. You can almost hear the telegraph key clicking and the crickets chirping.
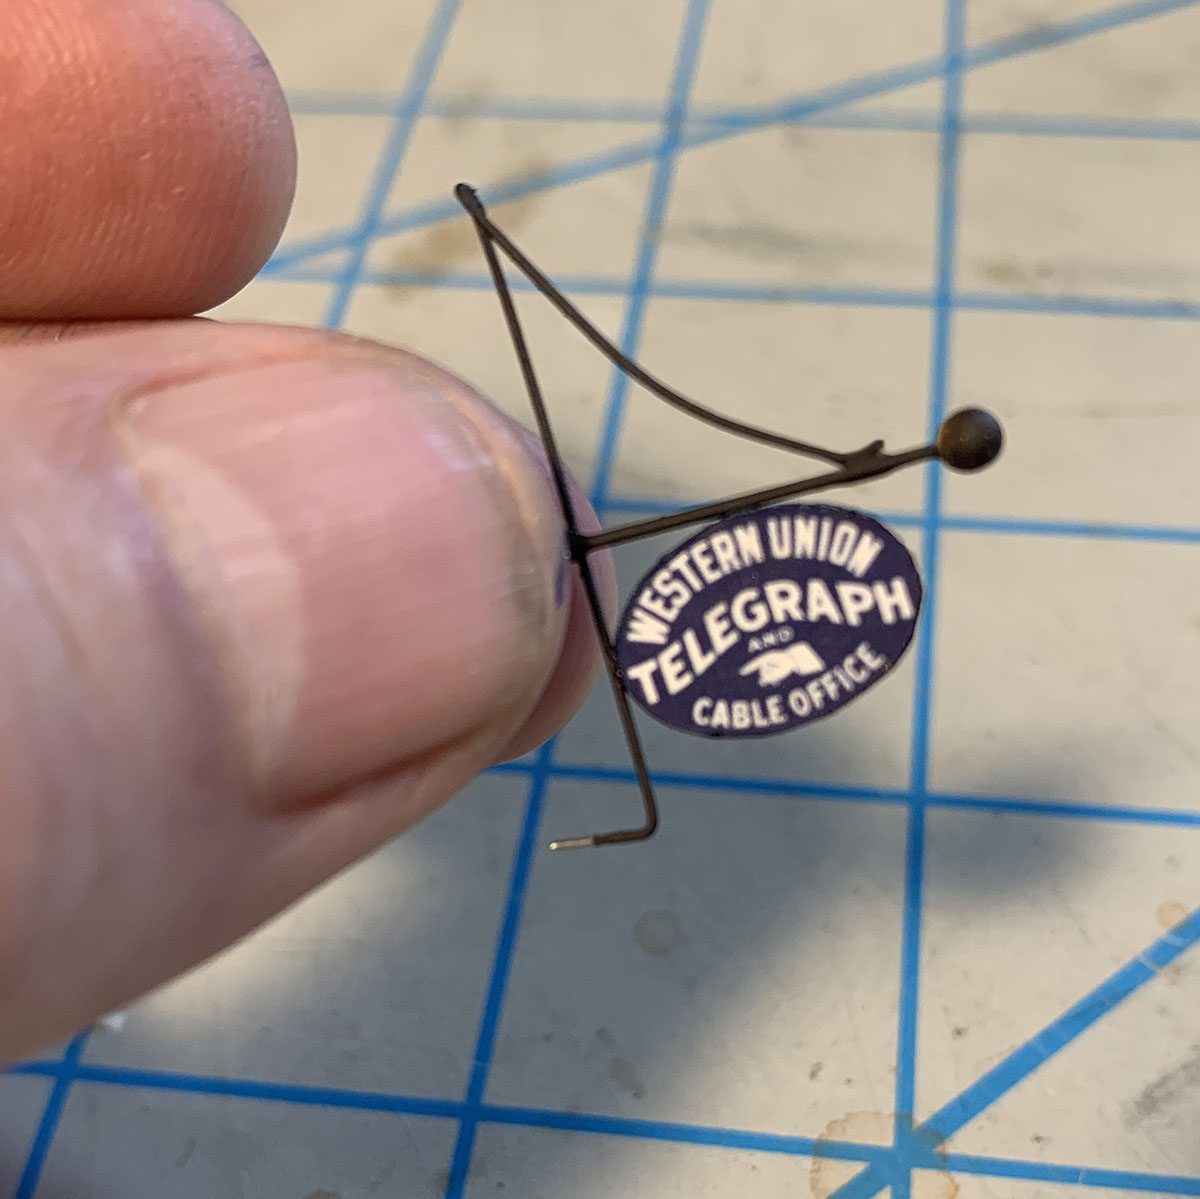
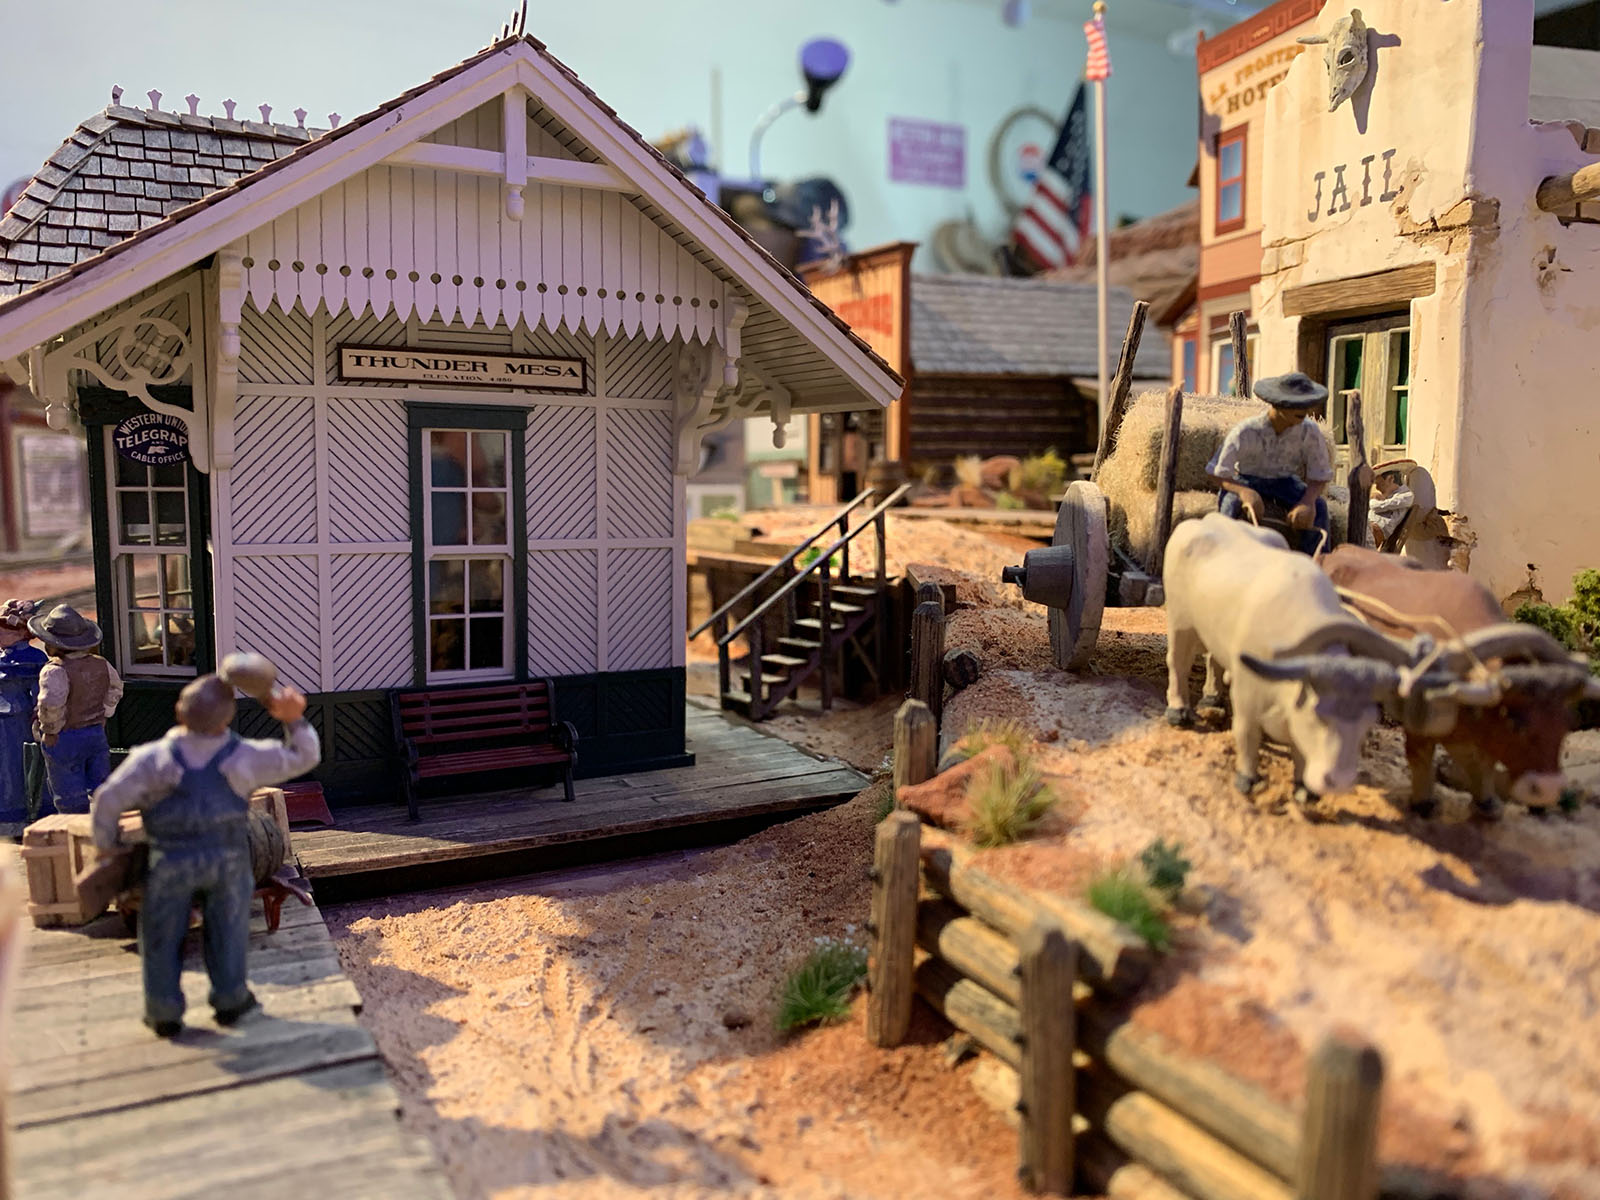
The 2-sided Western Union Telegraph sign was based on a similar sign at Disneyland. It was created in Photoshop and printed on thick paper. The sign bracket was made by soldering together some music wire and a dress pin.
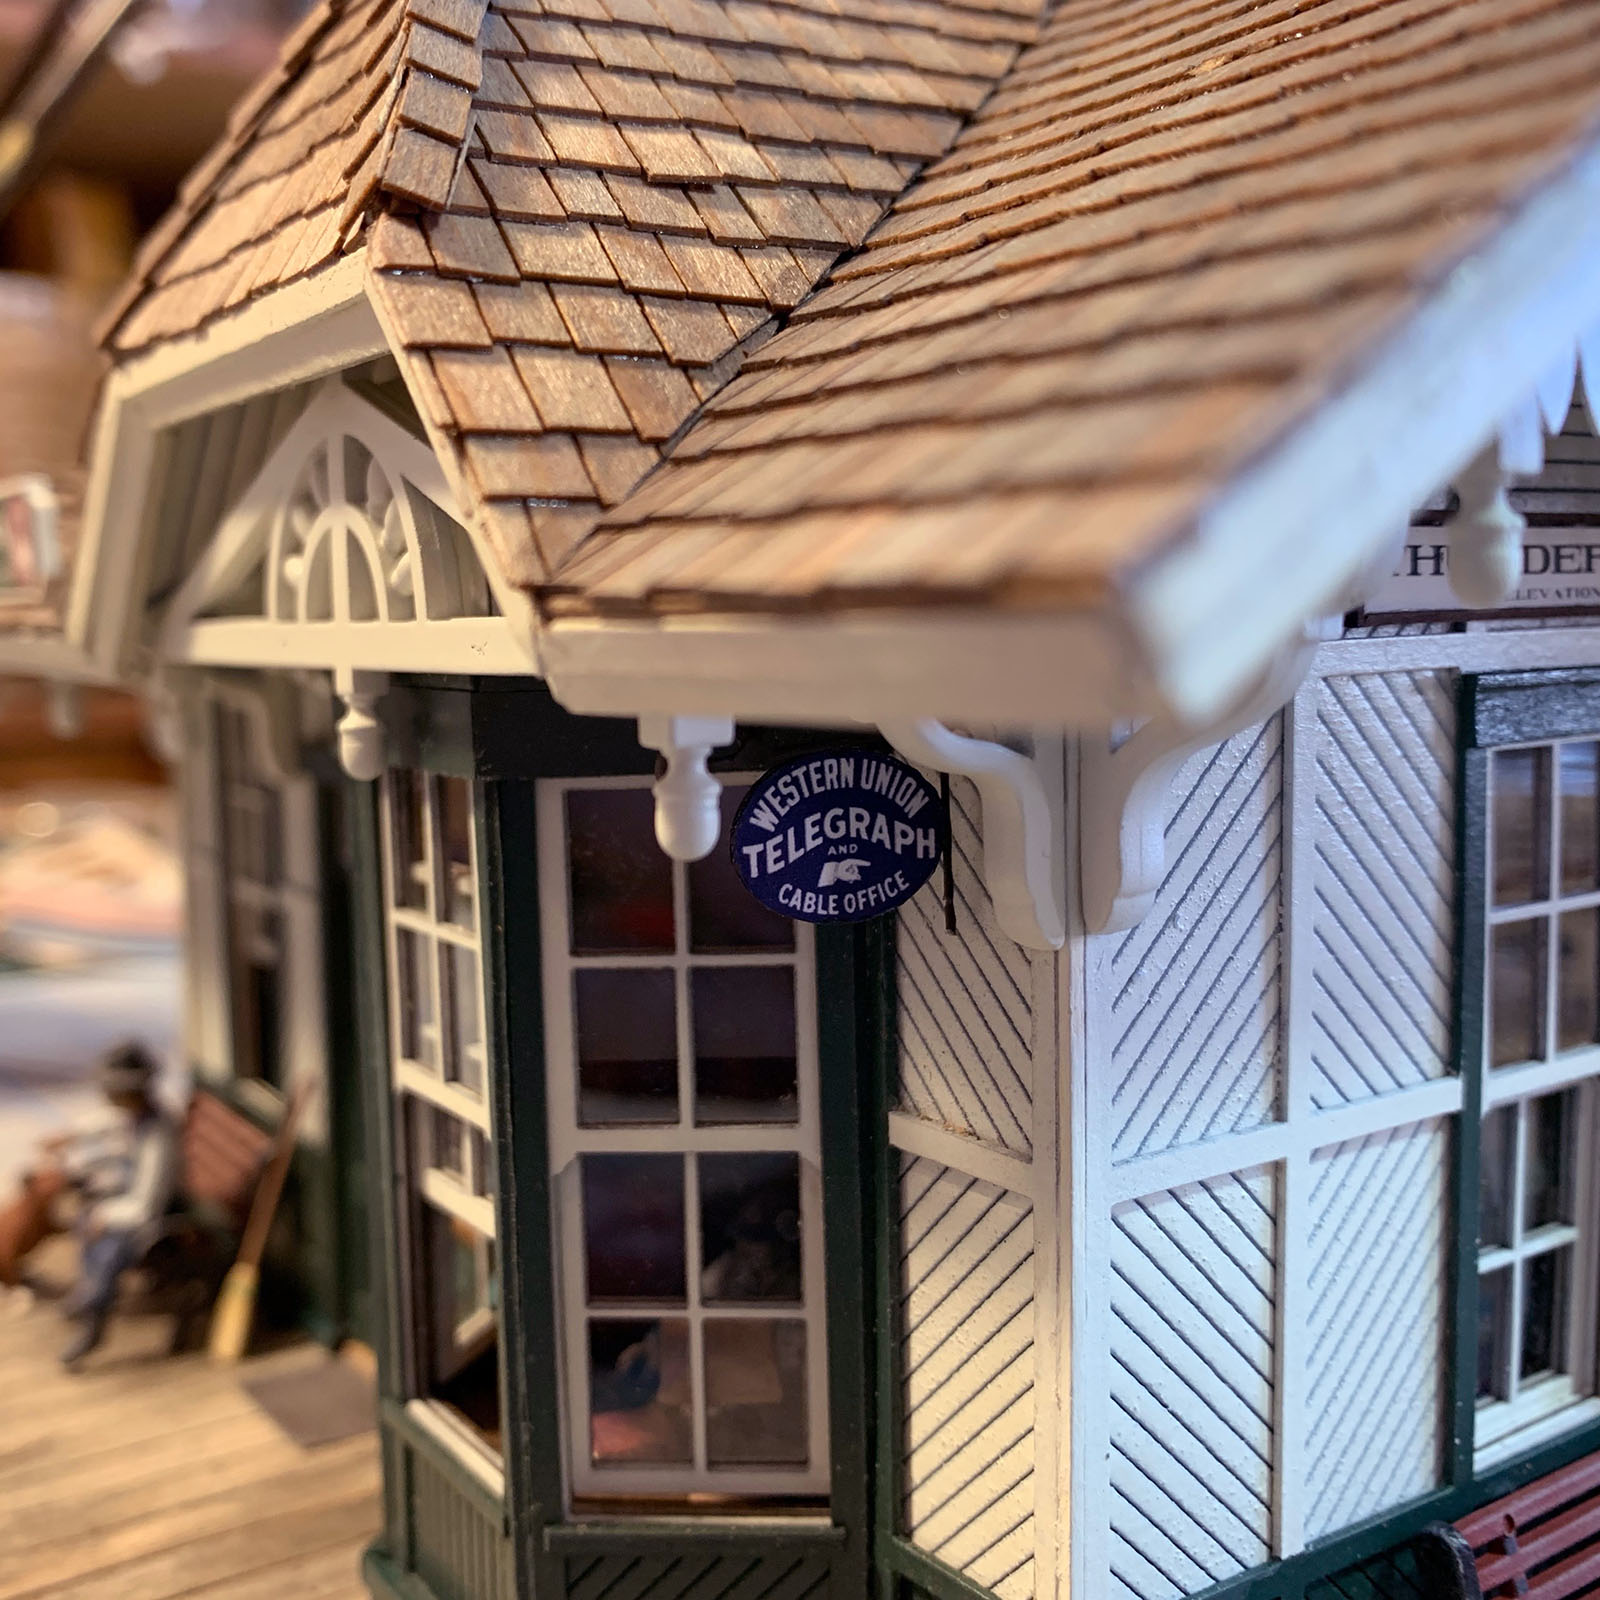
Small holes were drilled in the front wall to accept the sign bracket and it was cemented in place. The ability to add little details like this is one of the reasons I model in O scale.

had a lot of fun detailing the depot platform, arranging the figures and other elements to enhance the overall story. Figures here are from Knuckleduster Miniatures and Woodland Scenics, painted by me.
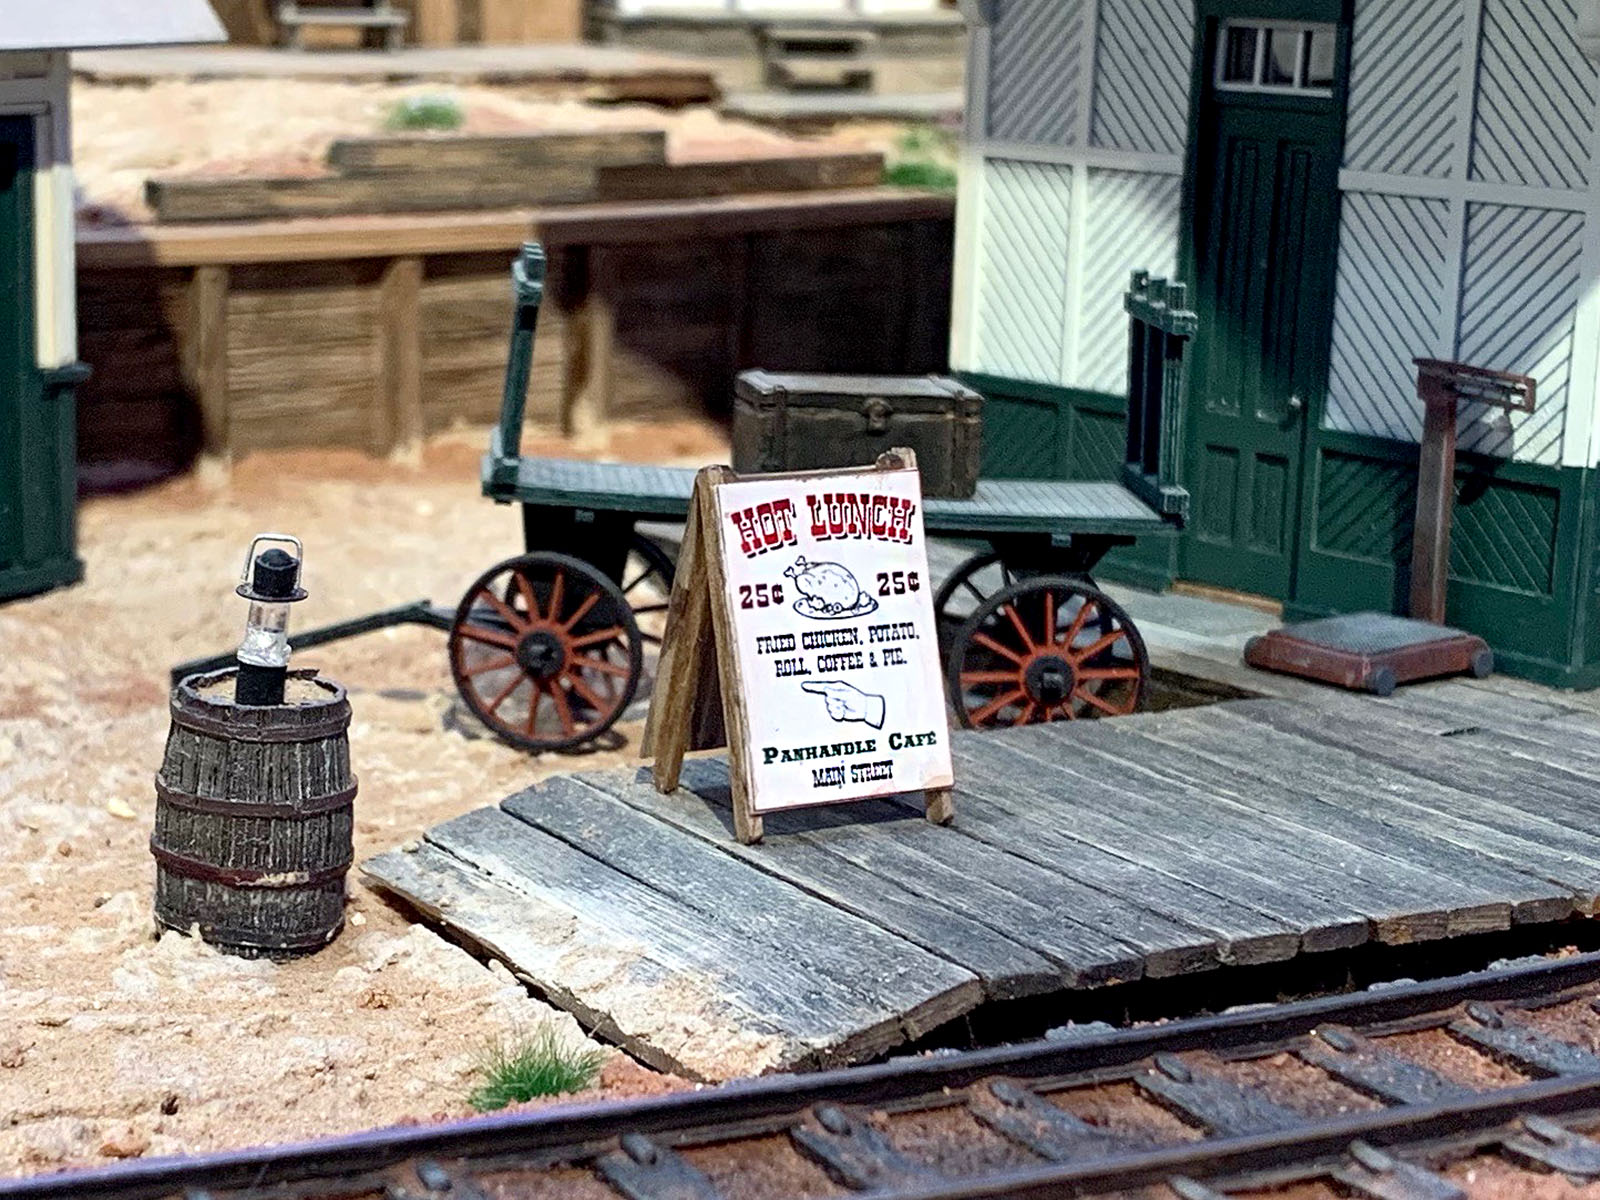
A scratchbuilt a-frame sign directs arriving passengers to the Panhandle Cafe just across Main Street. The baggage wagon was assembled from a Banta kit.

I decided that arriving passengers might need to refresh themselves after their long rail journey so I scracthbuilt this privy next to the depot. It was assembled from basswood and illustration board, detailed and painted to match the depot. It's important to note that not all 19th century outhouses were nasty shacks with moons cut in the door!
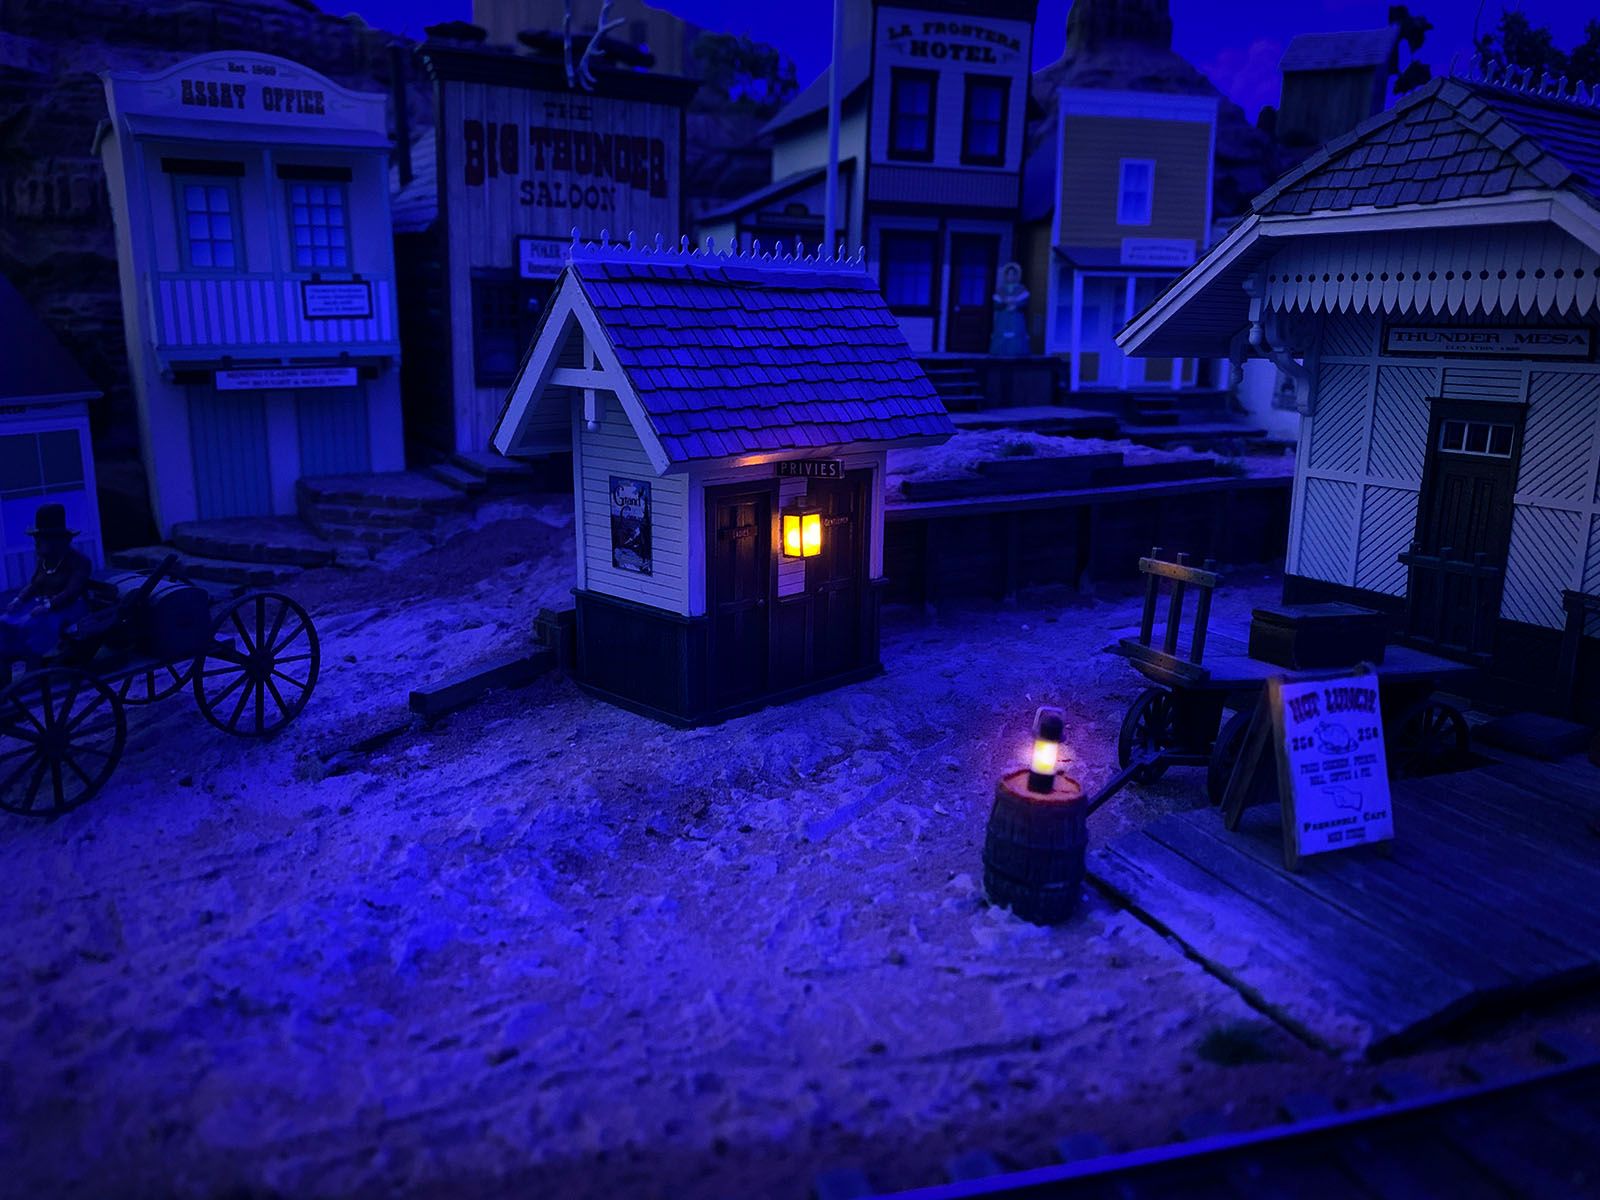
A look at the privy with the lanterns aglow. The lantern is a casting that came with the Grizzly Flats Depot kit. It was non-functional but I added a flickering yellow LED so passengers might find their way in the dark. By the way, it is an agreed upon fact amongst the Thunder Mesa locals that the depot has the best toilets in town.
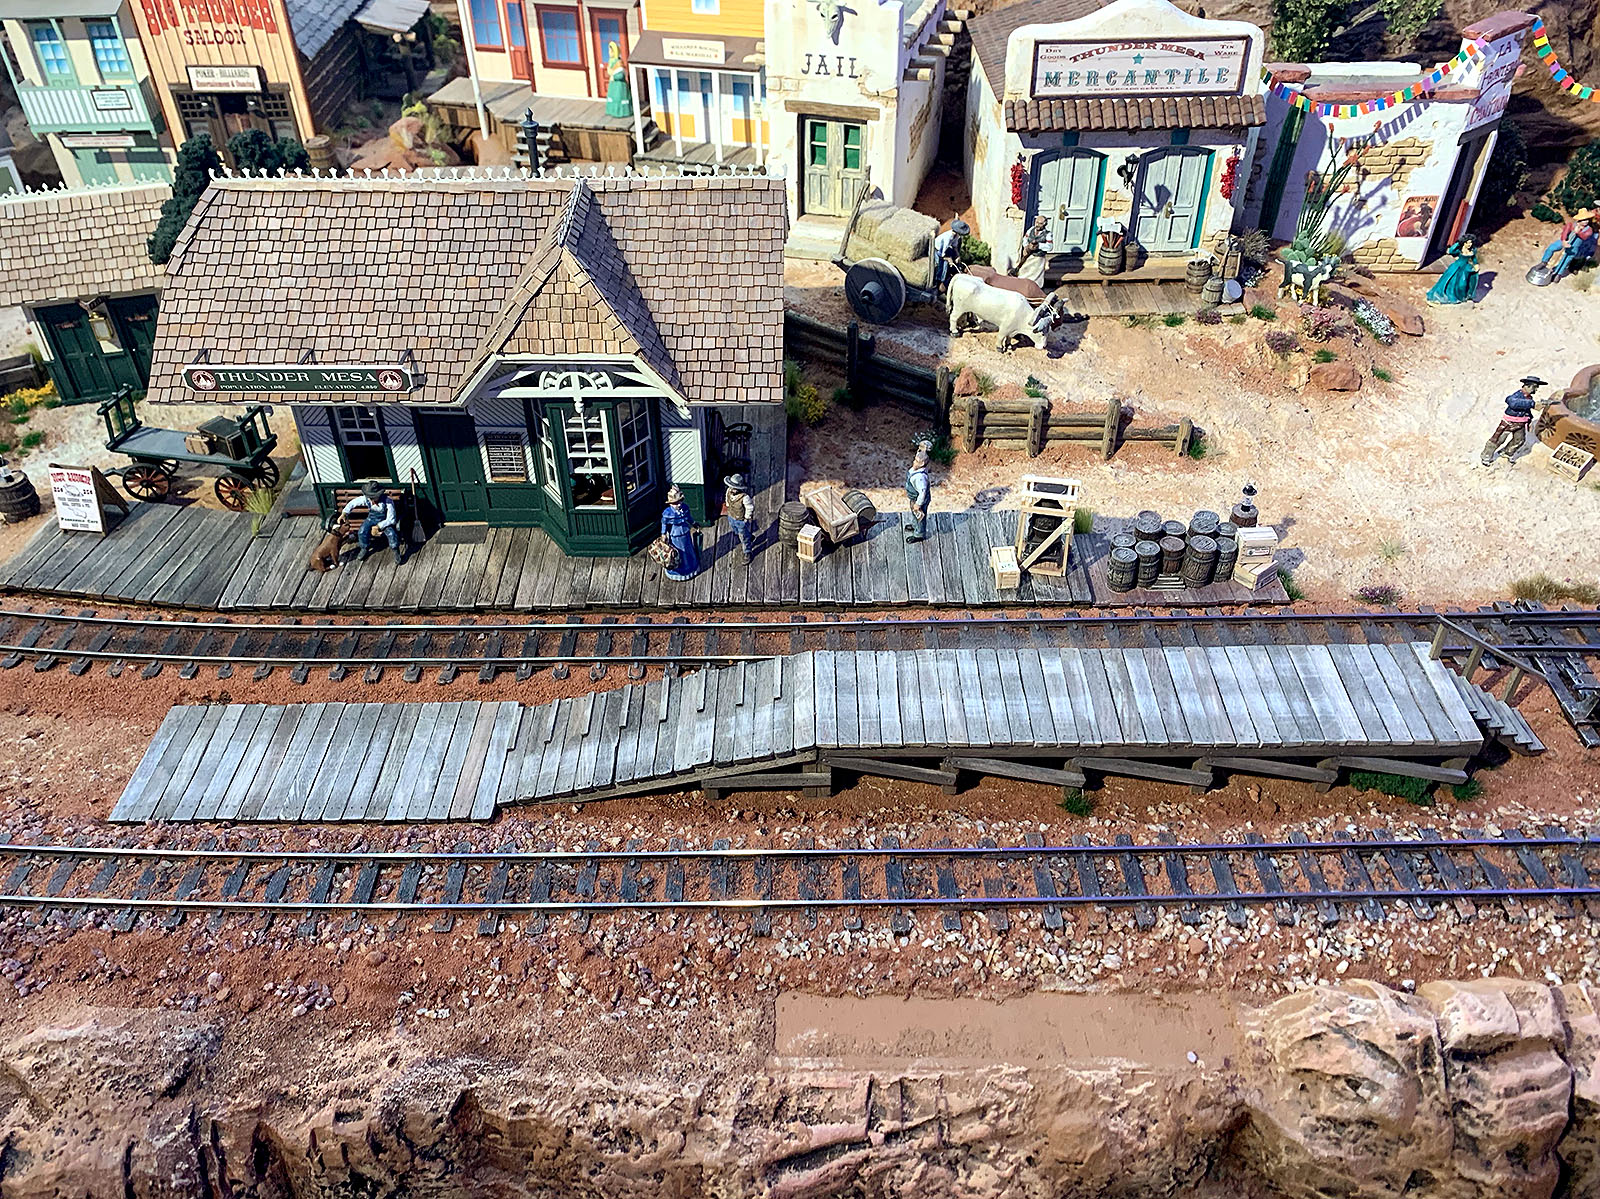
Another final detail was this loading dock between the parallel tracks in Thunder Mesa town. It's built from O scale lumber and coffee stir sticks, stained a weathered gray with my favorite alcohol and shoe dye mixture.
Over behind the depot, I built some stairs to connect the backdoor to upper Main Street. This is one of those details hardly anyone will ever see, but I know it's there.
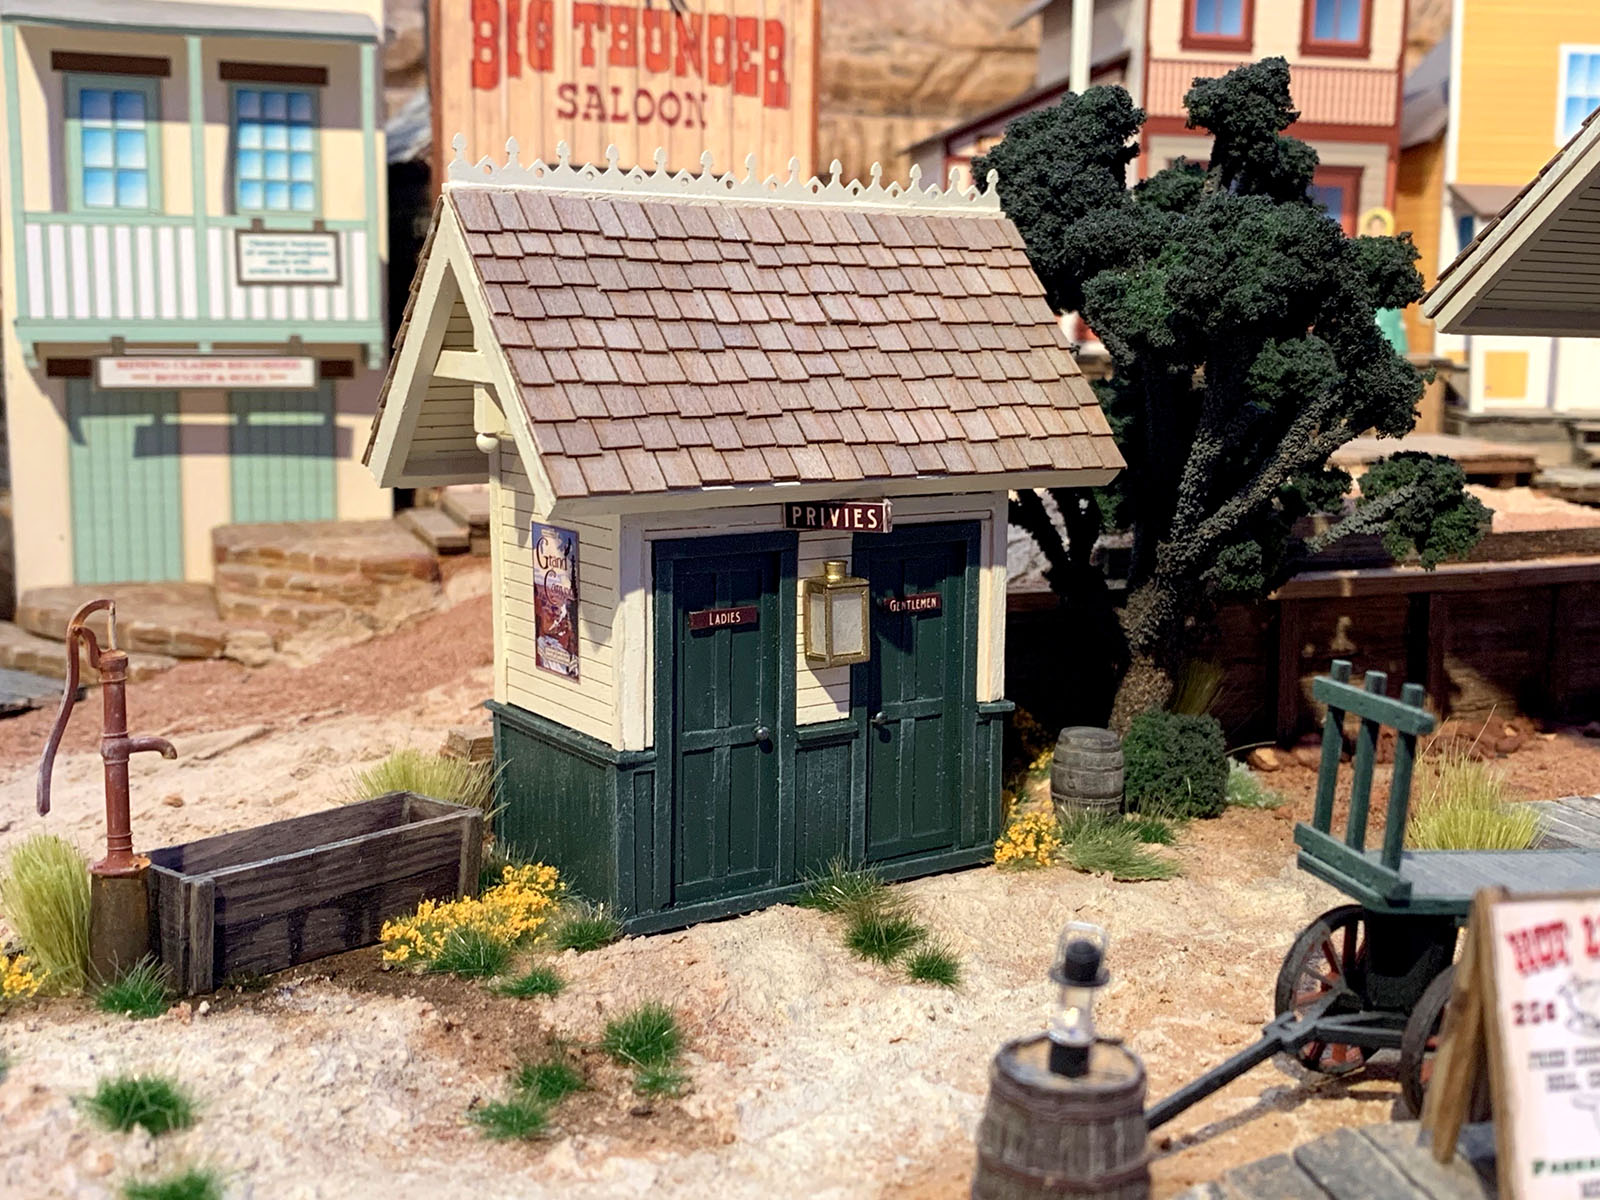
What's a privy without a place to wash up? The horse trough was scratchbuilt with "water" made from clear acrylic sheet painted murky green on the back. The hand pump is a casting from Berkshire Valley and the grass and flowers are from Scenic Express. For the small Pinon pine, I used a Woodland Scenics armature with the correct bushy shape but epoxied on a couple extra branches. Then I sprayed the whole thing with Super 77 adhesive and sprinkled on N scale ballast for bark texture. Then I airbrushed the tree dark brown and grey before gluing on Woodland Scenics dark green foliage clumps.
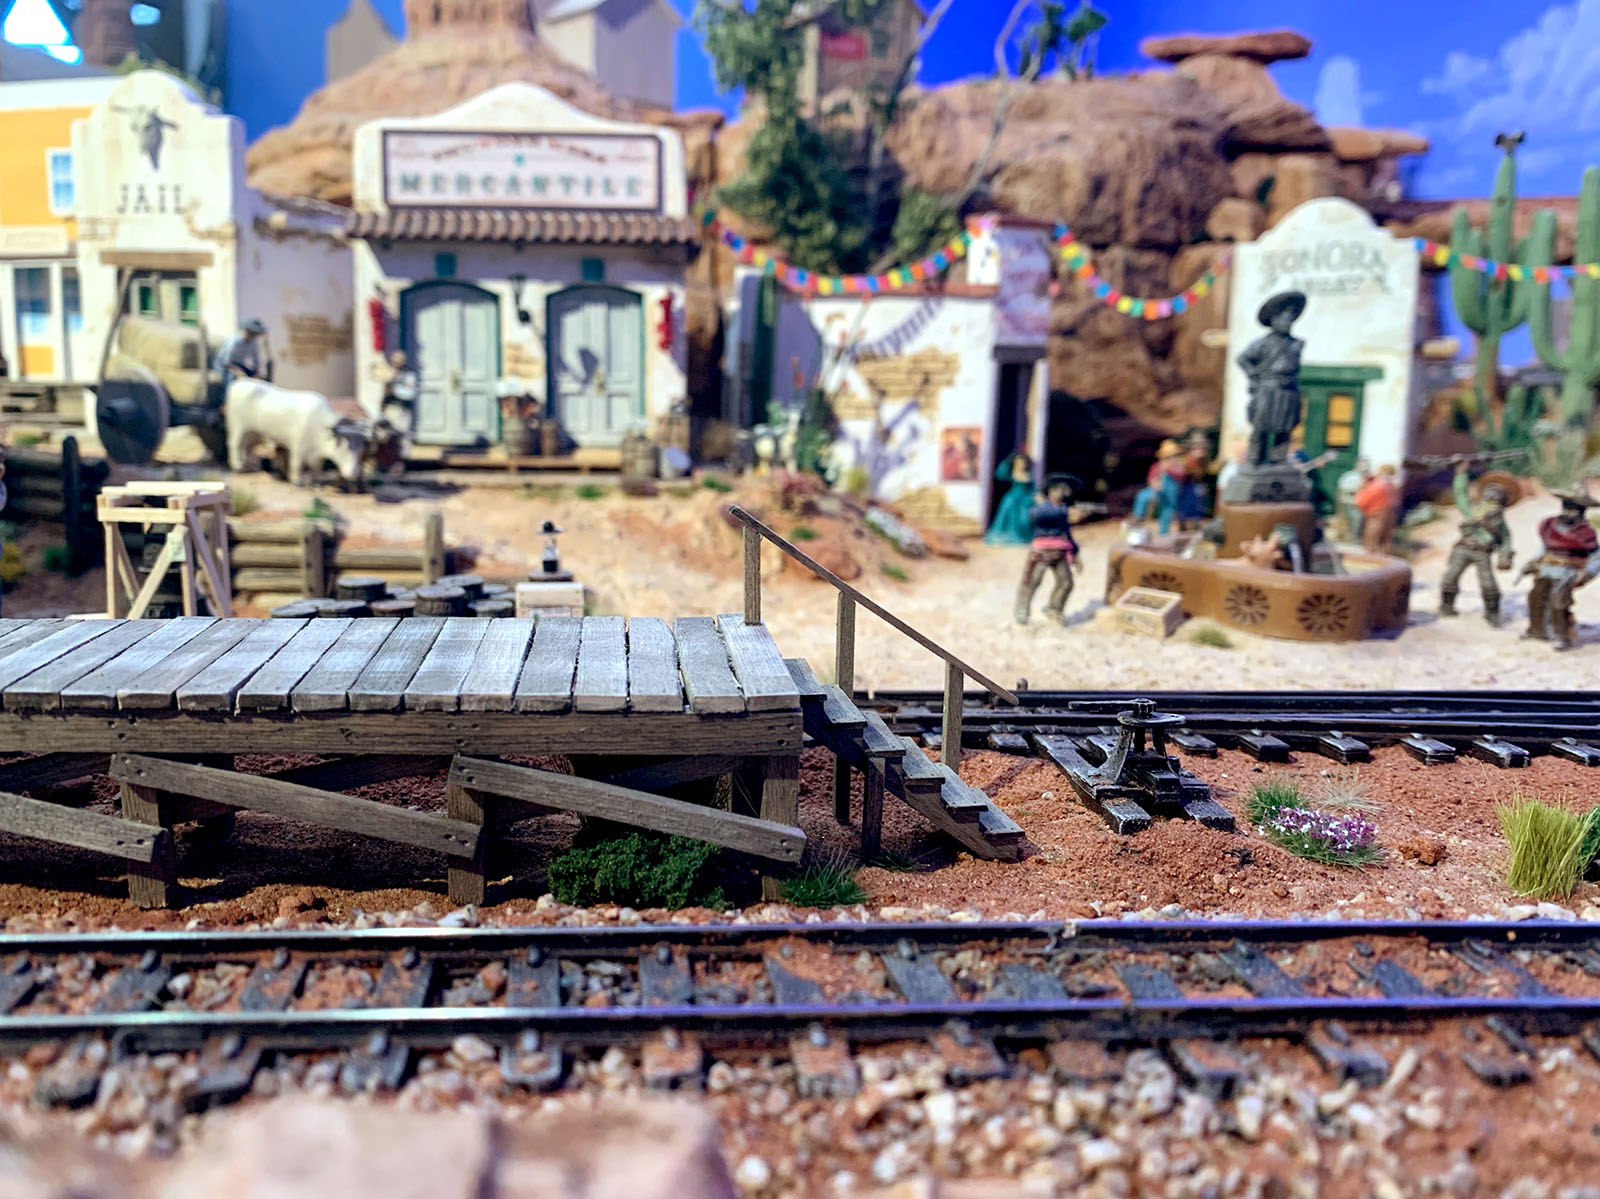
A set of stairs were also built for the freight platform. These are the same stairs that come with Crescent Creek Models O scale Gallows Kit.
And with that, the new depot project was finished. In this shot from Sept, 2020, the ground cover has been worked in up to the edges of the platform and a few new weeds have sprouted up. The previously installed telegraph sound unit from ITT Products below the layout now welcomes guests to the new Thunder Mesa Depot just as it did for the old.
This was a challenging, fun, and rewarding project to build, and I am very happy with the results. The new depot adds tons of charm and character to Thunder Mesa town, just as the structures that inspired it did for Ward's Grizzly Flats and Walt's Disneyland. Many thanks to Robert, Jake and the others who helped me on this project.
That's it from Thunder Mesa. Until next time, adios for now!
Thanks for following along, amigos. Registered users can leave questions and comments below so, please, join in the conversation!
All the best,
Dave
Dave GREAT JOB on the depot!! I’ve got one of the Scale Structures HO kits, this inspires me to build it . Again FANTASTIC JOB love the outhouse too.
Thanks, Kevin!
Thanks Dave. This has always been one of my favorite depots. I downloaded the drawing so hope to build a similar model someday.
I’m glad you posted on the MRH forum as I watch that frequently.
Thanks Neil! Not sure if I will continue posting on MRH. They seem to be unhappy with me for posting links rather than full articles, and, while I understand their point of view, I simply do not have the time or desire to post everything twice.
Dave, I think the way you posted on MRH forum was fine. One click took me to your blog site. Then the video was one more click. No problems. Not sure what their problem was. One extra click?
Beautiful work on the depot and related scene. Glad you shared this great building experience.
Rob Morrison
Thanks Rob. I don’t know either. Some people don’t understand how the internet works I guess. Reciprocal links actually help everyone’s numbers and SEO. To be fair it was not MRH staff that did the complaining.