Category: Thunder Mesa Town

A Water Tower for Thunder Mesa

Starting from Scratch

The one way to get exactly the structure you want on a model railroad is to design it and build it from scratch. The original water tower for Thunder Mesa Town was a built from a modified Banta Modelworks kit, but after I decided that it fit better in the scene over in Hanging Rock, I was left needing a new tank for this location. I've always liked the look of stone-based water towers, so when it came time to replace the tank at Thunder Mesa Town, I had a pretty good idea of what I wanted. I also wanted the railroad's herald to appear painted on the sides of the tank, and these requirements led to the materials and techniques used on the project as described below.


1

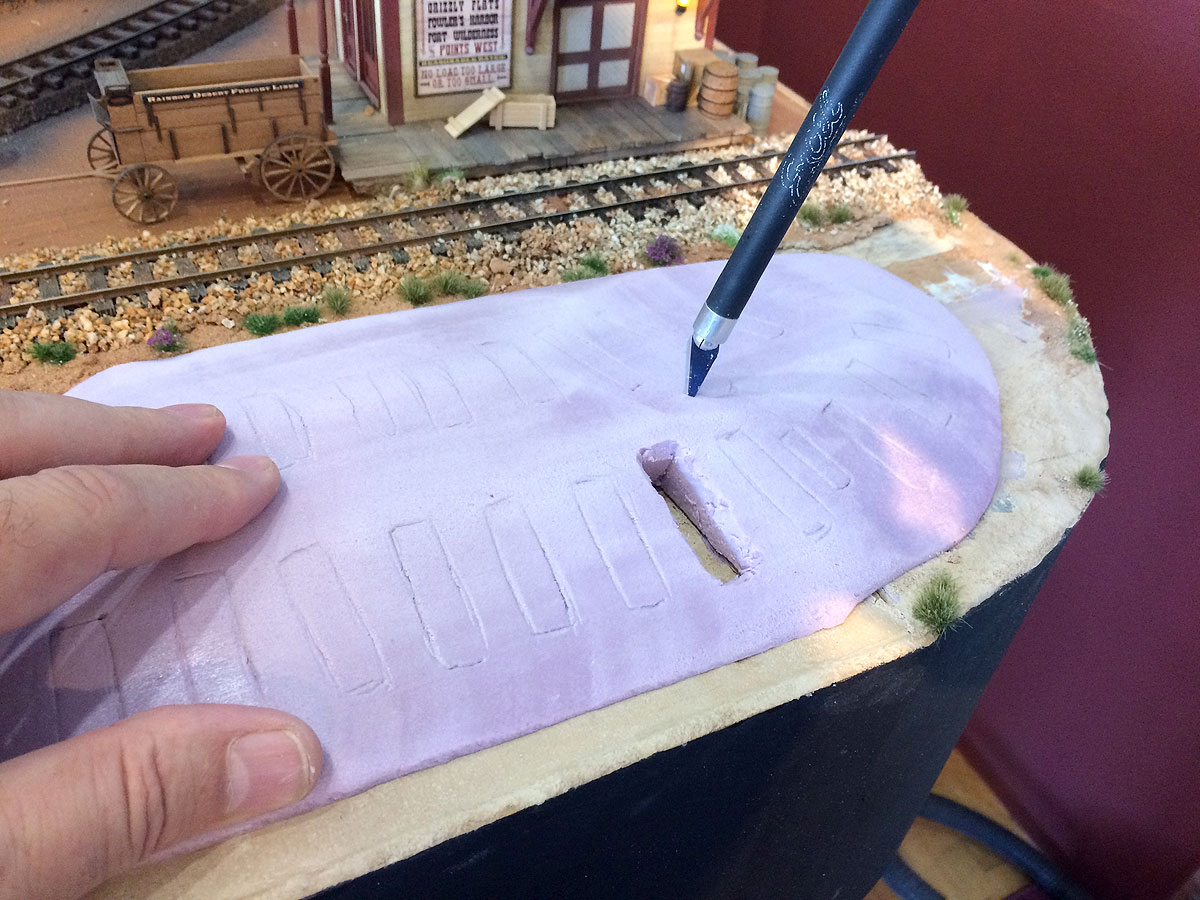
For the stone base, I turned to a versatile material that has been used many times before on the Thunder Mesa layout: Balsa Foam. Balsa Foam is basically the retail hobby version of the "gold foam" or "prop foam"used by Disney Imagineers and Hollywood prop makers. It has an excellent consistency for carving and no grain. I prefer the denser version sold as Balsa Foam II for its ability to hold finer detail. The stones for my pump house were carved using a hard HB pencil lead and a #11 hobby knife. I measured carefully for the doors and windows, and then carved out cavities for them so that they would appear recessed into the the masonry. Behind the window, I hollowed out a larger cavity so that the structure could be lit from within. Balsa Foam creates a lot of fine dust while carving so breathing protection should be worn.

2

Spray paint makes most foams disintegrate, but Balsa Foam is non-reactive, so the finished carving can be primed with your favorite brand of rattle-can paint. I used Krylon Ultra Flat Camouflage Brown. Once that had dried completely, the stonework was painted with inexpensive craft store acrylics. I chose colors that matched the scenery on my layout since I wanted it to appear that the stones were quarried locally. When satisfied with the painting, joint compound was pushed into the cracks to simulate grout between the stones. The excess was removed with a wet brush and, once dry, a thin, dirty wash of acrylics (basically the paint water) was applied over the entire structure to darken the grout lines. Then some individual stones were picked out with a small brush and random earth-tone colors.

3

I created lintels above the doors and windows with scale 6x6' strip-wood, a common architectural detail in the Southwest, then built the doors themselves from scribed basswood and wood scraps. The doorknobs are Atlas HO track nails, painted with Model Masters brass. The solitary window is a Grandt Line 6 over 6 masonry window casting cut in half and re-assembled with styrene cement. The roof panels, rafters and trim are all Crescent 300 illustration board. This material is about 1/16" thick and has an excellent surface for painting. I add woodgrain to the illustration board with a fine razor saw before scribing boards with a #11 hobby knife. Then I paint it with watercolors, using about a 50/50 mixture of burnt sienna and cobalt blue to achieve a silvery, weathered wood appearance. The watercolors soak into and darken the score lines and woodgrain doing most of the work for you. Heavily diluted acrylics could also be used for this, but I prefer watercolors. All of the basswood pieces were also stained a similar warm gray to match.

4

To achieve the look of old, pealing paint, I dabbed all of the trim pieces in likely spots with a latex resist known as Friskit. Rubber cement can also be used for this step but Frisket is specifically formulated for this kind of thing. Once the latex was dry, I airbrushed all of the roof pieces, doors, and windows with a dark, flat green. A half hour or so later, I rubbed the Frisket off with a kneaded rubber eraser to expose the bare wood underneath.

For the window, I simulated the look of old style, rippled glass by carefully painting Woodland Scenics Realistic Water onto the back of the thin acrylic glazing and then drying it quickly with a hair dryer. Since I didn't want the nearly solid interior of my structure to be visible, I also sprayed the back of the glazing with Testor's Dullcote once it was completely dry. Then all of the roof, trim pieces, and doors and windows were assembled onto the structure and cemented in place with Aileen's Tacky Glue.

5

To create a tank with the look of the Thunder Mesa herald painted on the sides, I turned to the technique of using realistic printed photo textures. I downloaded free hi-res wood textures from textures.com and then created my tank wrapper in Adobe Photoshop. I use Photoshop daily in my work as a commercial artist so this was second nature for me, but I understand that it is expensive software and has a steep learning curve. However, there are a few open source programs available like Gimp that can be used instead with very good results.

I made careful measurements as to the thickness of the tank slats, bands, and the relative positions of the heralds as all would appear on the finished model. I also added water stains and weathering in Photoshop by selecting and desaturating certain areas. Then I printed several copies of my tank wrapper on Epson Premium Matte Presentation Paper using the highest quality setting on my inkjet printer.

6

To build the tank, I laid out two 2.5" diameter circles on illustration board using a compass. Then the circles were cut out with a hobby knife. To insure that the circles were perfectly round and would align properly, I placed one atop the other and then drilled the compass point holes all the way through. Then I could chuck them up together in my Dremel tool and turn them against 300 grit sandpaper until the edges were perfectly matched and even. Cardstock supports were cut to size and glued in place for the tank interior, and then the entire assembly was wrapped with Bristol Board to form a cylinder. Bristol Board is a heavy illustration paper that shapes easily.

Once the tank structure was built, I laminated one of my tank wrapper printouts to a second piece of Bristol using 3m Super 77 spray adhesive, using a good even coat, and rolling with a brayer to insure good adhesion. This was then cut out and carefully glued in place around the tank structure using white glue. Rubber bands were used to hold everything in place until the glue set.

7

With the tank wrapper cemented in place, I repeated the laminating process with a second printout, and then cut out the individual tank bands to glue over the printed bands on the tank. The white paper edges of each band were carefully painted dark brown before each was cemented into place. This took a little time, but was well worth it for the convincing 3-d look achieved, especially around the TMMC heralds. Then, the bands were finished with white metal tank band fastener castings from Wiseman Model Service - a hobby supplier that I highly recommend.

Turning to the roofs, scale 4x8's were cut to size, stained, and then glued in place to form a support structure for the tank. Then I finished the pump house roof with laser cut printed paper shingles from Bar Mills and these were given a heavy weathering with various shades of colored chalk dust.

8

I wanted a conical roof for the tank, so a support structure was built from illustration board. The base is two disks, one slightly smaller than the other, and both turned in the Dremel and sanded to be perfectly round before being cemented together. The upright triangular pieces form a hexagon. This structure was then "skinned" with thinner Bristol to form a base for the shingles. The underside of the tank roof was painted a flat dark green to match the rest of the trim on the structure.

9

The tank roof was then shingled with Bar Mills laser cut paper shingles. This was not as easy as it sounds since their shingle strips are designed for straight roofs, not curves, and the strips had to be cut down to just 2 or 3 shingles each to match the conical shape of the roof. After this step, a finial cap was constructed from a small cone of Bristol Board and the head from a dress pin. This was primed, then painted with Model Masters Copper before being glued in place. The finial was then heavily weathered with blue-green colored chalks to suggest oxidation and tarnish. Then the rest of the roof was similarly weathered with gray and brown chalks.

10

Before shingling was complete, a small hatch was made for the roof from scribed basswood, wire, and some scraps from the drawer. All of this was stained and weathered to match the rest of the tank.

11

Thunder Mesa crews need to see how much water is in the tank, so a water depth gauge was created from paper, wood, and black thread and glued into place. Its strategic placement also does the job of hiding the seam where the printed tank wrapper and bands come together.

12

The spout, weights, and pulleys are Grandt Line white metal castings that were given to me by a friend of the railroad. I cleaned up the castings and then painted them with Krylon Ultra Flat Camouflage Brown paint from a rattle-can. Then I went back with a rag dipped in paint thinner and rubbed some of the paint away in likely areas. Rust and lime deposits were added by painting on colored chalk dust mixed with 70% isopropyl alcohol.

13

The spout hanger, or yoke, was built from scale stripwood, and the cables are elastic thread that has been stained silver-gray with diluted acrylics. All of this was assembled and glued to the tank before it was cemented to the stone base. Then the roof was carefully aligned and cemented in place with white glue. A final detail was the addition of an inflow pipe to bring water from the creek to fill the tank, a white metal piece left over from the Grandt Line spout assembly.

14

For a finished look, some matching trim was cut from stripwood, then stained and painted in the same manner as other trim on the pump house before being cemented in place below the tank. A short smokestack was created from a soda straw with a piece of styrene flashing, painted and then glued to the pump house roof as evidence of a steam powered water pump inside the structure.

15

Finally, a ladder was built for the tank using two sections from a Bar Mills laser cut ladder kit. A bracket built from scrap stripwood connects the ladder to the tank and pump house roof. The warm glow from the pump house window is provided by a 3mm yellow LED, wired to this layout section's 12v DC lighting, sound, and animation bus.

Wrapping Up

I little bit of touch up here and there with a small brush, and a little more weathering and blending with chalks, and the finished model is ready to be worked into the scene. Now it can do its job, filling the saddle tanks and tenders of thirsty steamers on the TMMC.

As always, thanks for checking in and following along. I hope some of you will find the techniques and materials described here useful. I'll be happy to answer any questions in the comments section below. Keep moving forward, amigos. Adios for now!


Boot Hill Part 3 and The Haunted Undertaker’s Shop

Studio Update - Sep 30, 2017

My Undertaker's Shop tribute to Disney's Haunted Mansion is just about finished as of this writing, with just a few more small details to add. The same is true across the street at Boot Hill Graveyard, where a new picket fence and a gnarled old tree have sprouted up. This week's video log goes into detail on the "illusioneering" and special effects at the Undertaker's Shop, and shows how I built the "Lantern Tree" in the graveyard from twisted picture wire and acrylic modeling paste. I'm pleased with how these scenes have turned out and quite happy to have them done in advance of next Saturday's Open Studio & Train Night.

The Undertaker's Parlor of Messrs. Atencio, Crump and Gracey has been installed in its plot near the front edge of the layout. A follower of the TMMC Facebook page suggested that I rotate the structure 90º to give guests a better view of the interior effects and that turned out to be an excellent suggestion. Thanks for that! Below decks, an ITT Products sound module with a 2", 8 ohm speaker plays a spooky 2-minute soundtrack that I created. George at ITT products was very helpful when creating this custom sound module and I highly recommend his products. Both the soundtrack and the interior Pepper's Ghost effect are activated by one of the "Big Red Buttons" that guests can push on the layout fascia. There's much more on the Pepper's Ghost effect in this week's Thunder Mesa video log.

Check out the video below for part 2 of the time-lapse Undertaker's Shop build.

Over at Boot Hill, I've been putting the finishing touches on the scene with a weathered wooden fence and a gnarled old Juniper tree that has a flickering lantern hanging from the branches. I wanted some sort of illumination for the scene during night operations and this seemed like a fun and clever option.

The picket fence was built from Grandt Line castings with scratch-built wooden posts between them. The knobs on top of the fenceposts are dress-pin heads. The fence was assembled in three large sections at the workbench where it was primed and painted before being installed in the scene. I primed it with Krylon flat grey before drybrushing on splotchy coats of light tan and white acrylics to simulate weathered and faded paint on a wooden fence. I still need to add the iconic "Boot Hill" sign to the crossbar above the gate.

I built the tree using braided picture-hanging wire, twisting several strands together to create the trunk and then unraveling the ends to simulate smaller branches and twigs. Some some scrap-box bits were glued to a 3mm yellow flickering LED to make a lantern, and then the soldered on leads were hidden within the tree's armature.  All of this was then coated with three or four applications of acrylic modeling paste to build up texture, taking care not to cover the lantern itself. I let the paste dry overnight before finishing the trunk with a dark brown primer, followed by several dry-brushings with lighter shades of tan and grey acrylics. The tree was then installed on the layout and Woodland Scenics dark green foliage clumps were cemented on with Aleene's Tacky Glue. You can see a time-lapse of the tree being built in this week's video log.

I'm pretty pleased overall with how the entire scene has come together. As usual, it turned out to be a little more complex than I had originally planned as additional effects and details were added, but I'm very happy to have it (mostly) done in time for the Halloween season! 

I'm not quite sure which project I'll be tackling next. There are a few more lighting effects I'd like to finish up before next weekend, but I'm also more than ready to get back to work on the Thunder Mesa Riverfront and its 50' paddle-wheel steamer. Right now, it's time to clean up the studio and get organized again after the last two weeks of frenzied modeling. Thanks for checking in, amigos. Adios for now!

PS: As a bonus for following along, I'm offering the ambient night sounds of Thunder Mesa and the Haunted Undertaker's Shop soundtrack as free Mp3 downloads. I created both of these tracks for the layout and they can be downloaded and played on any MP3 capable devise. Add a little nighttime atmosphere to your own layout or a spooky Halloween soundtrack. Have fun!

Thunder Mesa Night Sounds

Haunted Undertaker's Shop


Thunder Mesa T-shirts from Spreadshirt.com

Boot Hill Part 2 and the Old Jerome Cemetery

Studio Update - Sep 16, 2017

We're halfway through the month and I'm up to my eyeballs in new projects ahead of the Oct 7th Open Studio & Train Night. Still, I did find a little time to go exploring at the old Jerome Miner's Cemetery, my little town's answer to Boot Hill. And speaking of Boot Hill, that's one of the main project that's been occupying my studio time this week and the primary subject of this week's video log. I'm also deep into construction on the neighboring undertaker's shop, a project that should add some spooky new fun to the layout.

The old Jerome Miner's Cemetery is a little hard to find if you don't know where to look and most visitors to Jerome don’t ever go there.  It's a spooky and somber kind of place, and public records indicate that over 500 burials took place there. The oldest visible markers date to the 1890’s but there are undoubtably some much older graves whose markers have been lost to the ravages of time. Most of the readable markers display Mexican or Italian surnames - indicating this was a graveyard for the poorer immigrant labor-class of old Jerome. A little research reveals many tragic stories of death among the miners and other citizens. There were terrible mine accidents, disease, murders, and some quick frontier justice. Many of the graves are just shallow, unmarked holes in the ground, while others are more elaborate, surrounded by gothic wrought iron fences. I just love having this authentic bit of Old West history right here in my backyard.

The structure mock-up I teased in last week's video log has been revealed to be the undertaking parlor of Messrs. Atencio, Crump and Gracey, three well-known names among Disney Haunted Mansion fans. This is my small tribute to the Haunted Mansion and so far things are moving along at a good pace. Construction uses my preferred method of textured and painted illustration board. I created the façade and signs in Adobe Photoshop and then printed them out on heavy HP premium presentation paper using the photo-quality settings on my home inkjet printer. The printed façade was then laminated to Cresent 300 cold pressed illustration board using 3M 45 General Purpose Spray Adhesive before being cut to shape with a hobby knife. I'll go into more detail on the build in a future post, including the addition of a spooky Pepper's Ghost effect that will animate behind the upstairs window. In the meantime, here's a time lapse video of the structure build so far.

The construction of Boot Hill is well covered in the last two Thunder Mesa video logs (see last week's here), and next week's should see the project through to completion. I'll just add that the grave markers use the exact same printed paper texture technique that I've used on many structures and even on a couple of rolling stock projects. Researching, planning, and building the scene has been a whole mess of fun. Epitaphs on the markers are a mix of some borrowed from Disney's Haunted Mansion, Boot Hill in Tombstone, AZ, Knott's Berry Farm, and a couple originals I came up with that reference favorite movies like Blazing Saddles and the Bob Hope classic, Paleface. I started out with a goal of making 13 grave markers but actually wound up with closer to 20.

Next week I'll finish up Boot Hill by adding some fencing, lighting, and other details, and go more in depth on the Undertaker's place. So far everything is on schedule for the Oct 7th open studio where there will be a few other surprises in store too. Stay tuned! Thanks for checking in, amigos. Adios for now!


Postscript: On a sad note, while I was building the new undertaker's structure and preparing this blog, I learned that legendary Disney animator and Imagineer X Atencio had passed away at the age of 98. Francis Xavier "X" Atencio was a wonderful, multitalented artist who will probably be best remembered by Disney fans as the show writer and lyricist for both the Pirates of the Caribbean and the Haunted Mansion. Without X there would have been no "Yo Ho, Yo Ho," or "Grim Grinning Ghosts." Here's a lovely video tribute to X Atencio from the good folks at Fresh Baked Disney.  

Thunder Mesa T-shirts from Spreadshirt.com

Boot Hill Part 1 and a New Video Log

Studio Update - Sep 8, 2017

This week I started on a few new projects in preparation for next month's Halloween themed Open Studio & Train Night. Halloween has always been my favorite time of year and I'm looking forward to sharing some new scenes and fun night effects on the TMMC. Chief among these is the new Boot Hill scene that I've chosen to build at the front edge of Thunder Mesa town. This spot was recently home to a dummy spur track, installed as a convenient place for displaying the vertical boiler Marc F. Davis locomotive. That didn't last long though and TMMC #1 has now been relocated a little farther down the line. Check out this week's video log, where I show off some recently acquired vintage Lionel equipment, and to see the new Boot Hill scene begin to take shape. Below,  I'll go into a bit more detail on how Boot Hill is coming together.

The first order of business was taking up the dummy spur and scraping away most of the sanded grout and real dirt that made up the ballast and ground cover. Removing the spur was an easy decision since it had really become a track to nowhere. Once I started building the Thunder Mesa Riverfront it no longer made much sense as a stand alone scene. I popped the track off of the foam base with a putty knife and then scraped away the rest, taking care to preserve and save as many of the weeds, flowers, and clumps of pricey Scenic Express grass as I could.

Then it was off to my big box of scrap foam pieces for a likely sized chunk of pink EPF (extruded polystyrene foam). After cutting the rough shape with a hot-wire cutter, a sanding block was used to shape it into a low hill. Then I traced the outlines of several 1/4" scale graves with a hard lead pencil, and cut one empty grave out completely with a hobby knife. Then the hill was glued into place with Loctite Power Grab construction adhesive.

After that came the fun part, sculpting and blending the hill into the scenery base with Sculptamold. For some of the graves I added raised humps of Sculptamold, and for others I made a shallow depression to simulate older graves that had settled. A large hump of excavated "dirt" next to the open grave adds a touch of realism.

Once the Sculptamold had dried, everything was painted to match the rest of the scenery with my scenic base color. This is a lightened Raw Sienna tone that I have pre-mixed in a flat latex at my local home center. After that dried, I stippled on a thin layer of Polyblend sanded grout to enhance the dirt texture.

I dug the open grave down a bit deeper into the scenery base and then installed a 5mm diffused blue LED. This will be one part of the lighting package for the entire scene and should offer a spooky glow from regions beyond when activated.

The last thing added was a new structure mock-up to replace the Pack Mules building since it no longer made much sense being next to a graveyard. I don't want to say too much about the new structure yet - you can see the mock-up in the video - but I'll be ready to reveal much more about it by next week.

Last but not least, the less-than-fully-operational Marc F. Davis was moved down the line to be part of the scene at Saguaro Siding. This track is almost never used in operations and can be electrically isolated from the rest of the layout. An important consideration since the Marc F. Davis is DC powered and the motor would quickly burn up with exposure to higher DCC voltages. It will probably stay in this spot for quite awhile.

As for me, I gotta keep moving forward. There are many projects in the works and I'm having a lot of fun with all of them. Wait 'till you see the moon over Thunder Mesa! Thanks for checking in, amigos. Adios for now!

T-shirts from Spreadshirt.com

A New Scene for the Marc F. Davis

TMMC Update - July 8, 2017

Now that the layout has been successfully moved and I'm all settled in to the new studio, it's time to get back to work on the railroad and some other projects. Here's an update on what's been going on over the passed week.

The front edge of the layout by Thunder Mesa town is one of the first things guests see when they visit the layout. The space was originally home to Thunder Mesa Depot, but after that structure was moved during a redesign of the town, the narrow strip of layout in front of the tracks sat torn up and empty for a long time. One idea was to put some stock pens there, but those will now be built across the tracks below Castle Rock and Injun Joe's Cave. This frees up the space for a new scene featuring the Thunder Mesa Pack Mules building and a dummy spur track for displaying the Marc F. Davis locomotive, TMMC #1.

The sad truth about the one-spot is that it has always been a poor runner. It was a scrap-box special, built several years ago atop a DC powered Bachmann HO cable car power truck. Theoretically I could take it apart and add a tiny decoder somewhere to make it work with the rest of Thunder Mesa's digitally controlled equipment, but I just don't see that paying off with a better operating locomotive. The motor itself is poor and the electrical pick-up is spotty at best. So, for the foreseeable future, it will remain a static model. On the plus side, the headlight works great.

Still, I've always liked the funky, homebuilt look of the Marc F. Davis, and have long thought about building a small scene around it that might be a fitting tribute to its namesake.

Something else I've always liked is the old Rainbow Ridge Pack Mules structure that once stood at Disneyland. I did a plan for it based on old photographs (the structure is long gone), and built a mock-up several years ago with no clear idea of where it might be located on the layout. Putting that structure together with a new grade crossing and a dummy spur for the Marc F. Davis gave me the nucleus of a new scene to greet guests when they visit the TMMC at Thunder Mesa Studio.

Building the Scene

I started by building up the rounded corner of the layout with layers of 1" thick extruded polystyrene foam or EPF. The pieces were cut to shape with a hot-wire tool and then glued in place with Loctite Powergrab adhesive. Then I sanded the layers flush and glued on a curved section of fascia made from illustration board treated with a clear acrylic sealer. It's lightweight, tough, and does the job. Then I painted the corner flat black to match the rest of the layout fascia.

Next I cut a section of Peco On30 flextrack to length and then removed several of the ties to give it more of a hastily-built old siding look. This was then primed and painted, and then glued to the foam roadbed with a bead of Powergrab. This is a dummy spur so it won't be getting any power. The DC motored Marc F. Davis would burn out on the DCC powered tracks of the TMMC.

I cut a piece of 1/8" thick Masonite to size to act as a foundation for my upcoming model of the Thunder Mesa Pack Mules building. This received a wooden boardwalk/porch along two sides made from distressed coffee stir-sticks weathered with an alcohol/shoe dye mixture. A square of illustration board cut to the same dimensions was then glued in place on the scene to save space for the model when ground cover was added in the next step.

I mixed up some Polyblend Sanded Grout in a small plastic container. I measure out small amounts with a paper Dixie cup and then add water slowly, stirring until the mixture is completely wet, but not runny - about 3:1 grout to water. The color grout I use is called "Sandstone" but I usually end up painting or tinting it once it's dry. Then I half poured, half spooned the grout on to the layout surface until the entire scene, except for the track, was covered by a layer about 1/16" to 1/8" thick. Using an old paint brush, I then stippled the grout to give it an uneven, dirt-like texture. As the grout began to set-up, I used a pencil and a model horse figure to add wagon ruts and hoof prints to the road and other high traffic areas.

Turning my attention to the track, red-rock dirt from Sedona was used to ballast the dummy siding and give some variation to the grout. This was then glued in place with a sprayed mixture of matt medium and water, diluted about 4:1. As all of this dried, weeds, grass, and flowers from Scenic Express were planted in likely spots with small dabs of white glue.

Then it was just a matter of touching up the track, and setting the train and structure mock-up back in place to visualize how everything was coming together. There's much more to come on this scene, including some new figures and a humorous vignette that ties the story of the Pack Mules and the new siding together in true Marc Davis fashion. Across the tracks, new livestock pens belonging to the Circle D ranch are slated to be built. Stay tuned for that!

Thanks for checking in! The plan is to make this a new series of weekly updates on the railroad, posting each Saturday or Sunday. Let's see if I can keep it up. Adios for now!